Preload, preconnect and prefetch with WordPress.
Preload preconnect and prefetch with WordPress. How to use these resource hints, why you’d want to preload, preconnect and prefetch resources, how to go about adding these to your site, and the benefits of doing so.
These preload, preconnect and prefetch directives all come under the umbrella term of browser resource hints, so this post effectively covers browser resource hints when using WordPress as well.
It’s not very difficult to add these resource hint directives to your site’s pages (I’ll cover this in more depth later in this post), it’s knowing when to use these resource hint directives that’s a bit harder to work out.
This post covers:
- Why you might need preload, preconnect and prefetch resource hints.
- What are the preload, preconnect and prefetch resource hints?
- Bringing preload, preconnect or prefetch in to effect on your site.
- Knowing when to use the preload, preconnect and prefetch resource hints.
Why you might need preload, preconnect and prefetch resource hints.
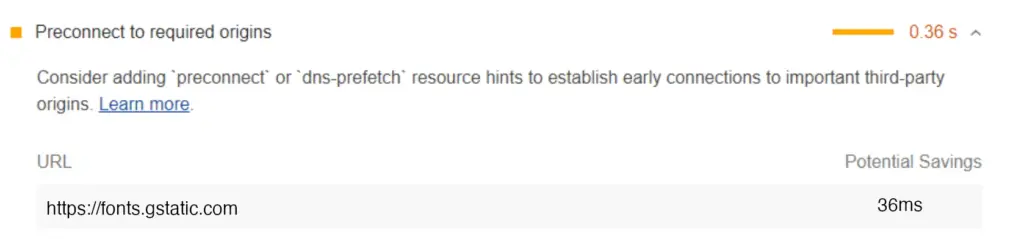
You might need to consider using preload, preconnect and prefetch resource hints if tools such as Page Speed Insights are listing opportunities such as “Preconnect to required origins”:
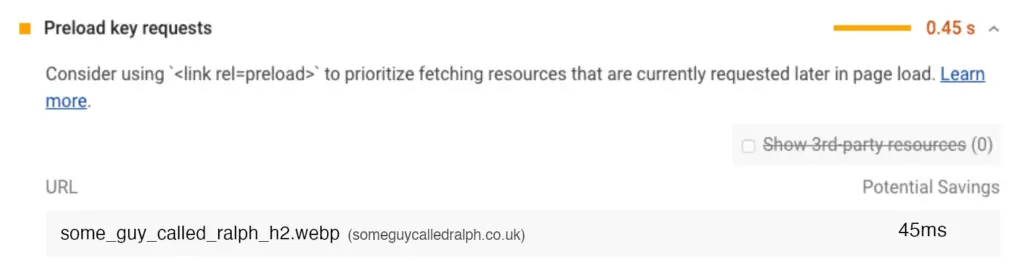
Or “Preload key requests”:
Or “Preload largest contentful paint image”:
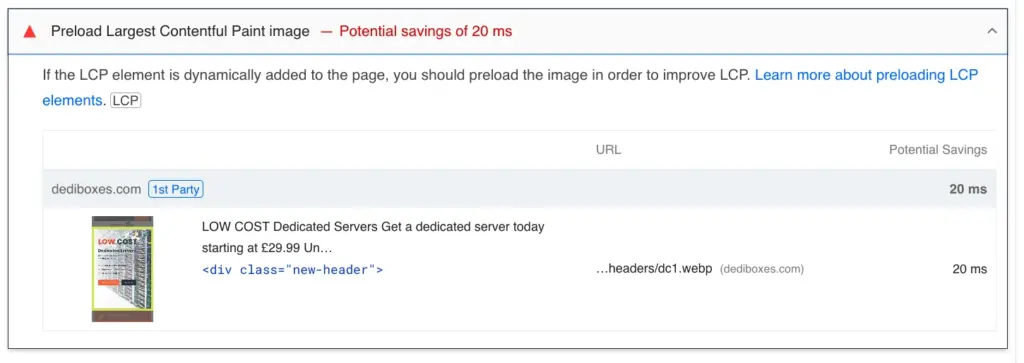
What you’re being informed of with regard to both of the above is that your site’s pages could load in a lesser amount of time if you use resource hints to tell the browser to load specific resources in advance of when they would normally be loaded.
In this context, the benefit of using resource hints would be improved page load times, and a better experience for site visitors.
What are the preload, preconnect and prefetch resource hints?
These resource hints are ways of telling a browser to load content or resources earlier than it would if standard page rendering took place, or to connect to an external server before the resource held on the external server is required.
You might think of these resource hints as a way of you telling a browser how to multitask more effectively than it otherwise would, when loading pages on your site.
As with multitasking doing everything all at once isn’t very effective, so knowing what to preload, prefetch or preconnect is quite key to using these directives. Consequently it helps to understand what each of these directives do.
Preconnect
The preconnect directive tells browsers to connect to the server where an external resource that’s used by your site is held, as a priority. This helps reduce the time impact associated with DNS lookups and network latency.
The DNS lookup and network latency themselves aren’t actually reduced by using preconnect, it’s just the browser starts these sooner that it would without preconnect being being used. By prioritising resources using preconnect a delay that would otherwise be present (if preconnect wasn’t used) is minimised.
An example of preconnecting to server.com would look like this:
<link rel="preconnect" href="https://server.com">A practical example of using preconnect might be if you’re using Google Fonts and calling them from https://fonts.google.com. In this context you’d use preconnect like this:
<link rel="preconnect" href="https://fonts.gstatic.com" crossorigin>The crossorigin attribute is added to ensure proper handling of cross-origin requests (requests sent for resources held externally to your site).
In human terms, this is like saying “Browser, you’re going to need some google fonts later in the rendering process, get the DNS lookup and network connection done now, to save time later on, please”.
Prefetch
The prefetch directive is used to tell a browser to fetch and cache resources that might be needed for subsequent page loads as visitors navigate around sites. Prefetch isn’t specific to the page that’s currently loading, it’s specific to pages that might be loaded in the future. Prefetch us useful for non-critical resources, such as images, scripts, or stylesheets, which are likely be needed on pages navigated to in the immediate future.
An example of using prefetch to prefetch page2.html of your site would look like this:
<link rel="prefetch" href="page2.html">A practical example of when you might use prefetch might be along the lines of you running an online store, with a generic home page, and product images on pages behind the home page. If you wanted to, you could use prefetch in the <head> of the homepage to prefetch product images, that are displayed on product pages that the visitor might navigate to.
An example of the above would look like this:
<link rel="prefetch" href="product1-images.jpg">
<link rel="prefetch" href="product2-images.jpg">
What’s effectively being done here is that the browser is being prepared with resources needed on subsequent pages that a visitor might access.
Preload
The preload directive tells a browser to load a resource (such as a script, stylesheet, font, or image) as soon as possible (even before the browser parses the rest of the page’s HTML).
Preload can be used to fetch resources that are critical for page rendering that would otherwise cause a delay in rendering if preload wasn’t used.
An example of preloading some CSS would look like this:
<link rel="preload" href="styles.css" as="style">An example of preloading an image would look like this:
<link rel="preload" href="https://website.com/path/to/image.jpg" as="image">A practical example of when you might use preload might be something along the lines of:
You’ve made someone a website, and the header image is causing a delay with LCP. You optimise the image, but the site owner doesn’t like the quality (due to the optimisation). You don’t really have much choice here but to use the higher quality image. You could preload the higher quality image to mitigate some of the LCP delay, as doing this would tell the browser to download the image sooner than it would do if preload wasn’t used.
As
The as attribute is used in conjunction with preload to tell the browser what type of resource is being preloaded. This affects resource prioritisation (as certain resources have a certain priority, which I’ll come to in a moment) and tells the browser which accept headers to send :
- font – Font files (WOFF etc.)
- style – CSS files
- script – JavaScript files
- document – IFrames
- image – Images
- video – Videos
- fetch – XHR/fetch requests
In the examples given above you can see that I’ve used the as attribute to preload a CSS file as=”style” and an image as=”image”.
It’s important to use the as directive correctly, as not doing so will result in the browser fetching the resource twice.
The natural order of priority that’s used can vary according to use, but it’s often in this order (with the highest priority listed at the top of this list):
- Critical CSS files
- Critical fonts
- Critical scripts (Javascript)
- Images and videos (media)
Fetchpriority
The fetchpriority directive can be used with preload to override the natural order of priority.
If you’re preloading a resource, such as an image, that would normally have a low priority you can use the fetchpriority directive to load the image with a higher priority than would normally occur.
So if you’re preloading an image like this:
<link rel="preload" href="https://website.com/path/to/image.jpg" as="image">But you’d like the image to be loaded with a higher priority, you’d use fetchpriority in conjunction with the above to do so, like this:
<link rel="preload" href="https://website.com/path/to/image.jpg" as="image" fetchpriority="high">Bringing preload, preconnect or prefetch in to effect on your site.
The preload, preconnect or prefetch resource hints need to be placed in the <head> section of your site.
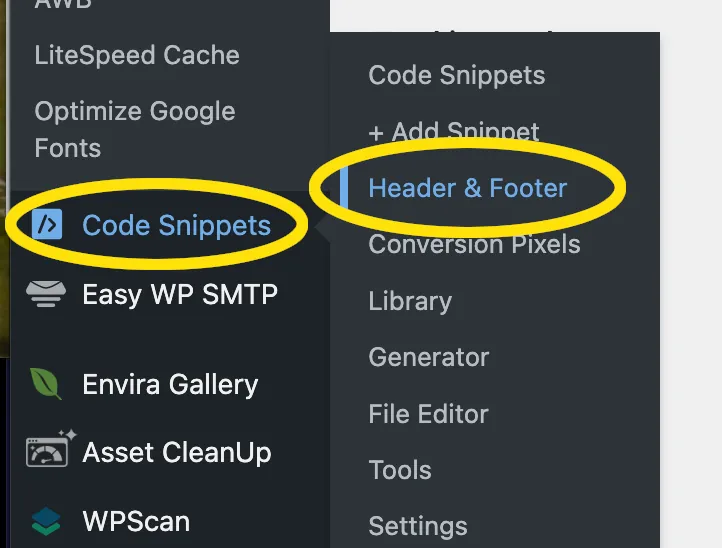
There are a variety of plugins that can be used to add code to <head> such as the Head, Footer and Post Injections plugin or the WPCode plugin. I’m going to use the WPcode plugin for this example.
You’d install the WPcode plugin just like you would any other plugin, and after doing so, hover over “Code snippets” in the menu on the left hand side of your WordPress dashboard, then click on “Header & footer”
Then add your required resource hint in the “Header” section, then click “Save Changes”:
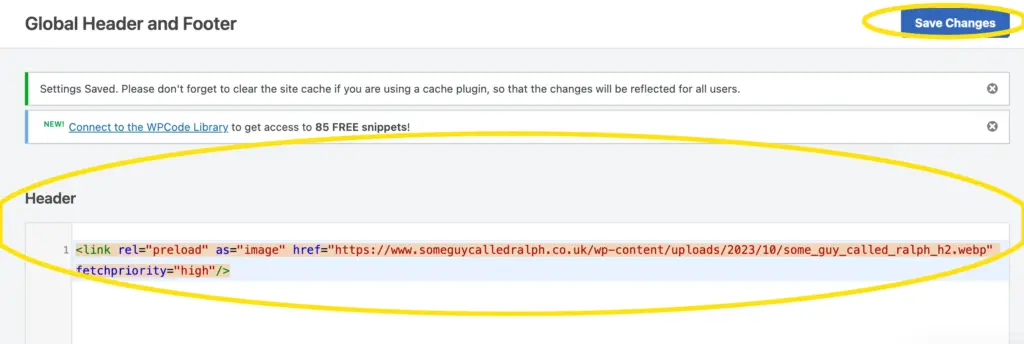
You may then need to clear caches, but that’s the resource hint added.
Whilst the above seems easy enough, the adding isn’t really the hard part. It’s knowing when to add resource hints that’s the harder part.
Knowing when to use the preload, preconnect and prefetch resource hints.
Key point here: Don’t over use resource hints
If you do overuse resource hints, what you’re effectively doing is telling the browser to prioritise the loading of a lot of resources. Doing this is more likely to slow things down than it is to speed things up. The more you put at the front of a queue, the more has to be worked through before the rest of the queue gets processed.
Less is very much more when it comes to resource hints.
It’s much more effective to preload, preconnect and prefetch a fewer amount of resources, and to be able to do this effectively, it’s key to identify what to preload, preconnect and/or prefetch.
You could potentially use tools like Page Speed Insights or Speed Vitals to tell you what to preload or prefetch, that would be an easy way of doing things (they’ll usually provide the URL of a resource that you can use to make your resource hint).
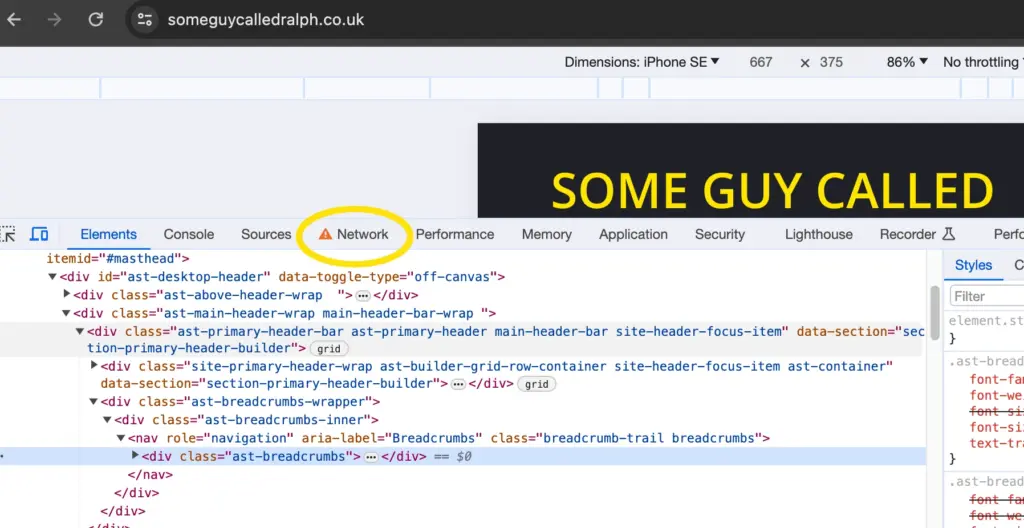
The other way of doing things would be to use the “Network” and “Sources” tabs in Chrome’s developer tools to identify what could be preloaded, preconnected or prefetched.
To access Chrome’s developer tools, right click on a page, then click on “inspect”.
Then, on the section that opens at the bottom of the screen, click the “Network” tab:
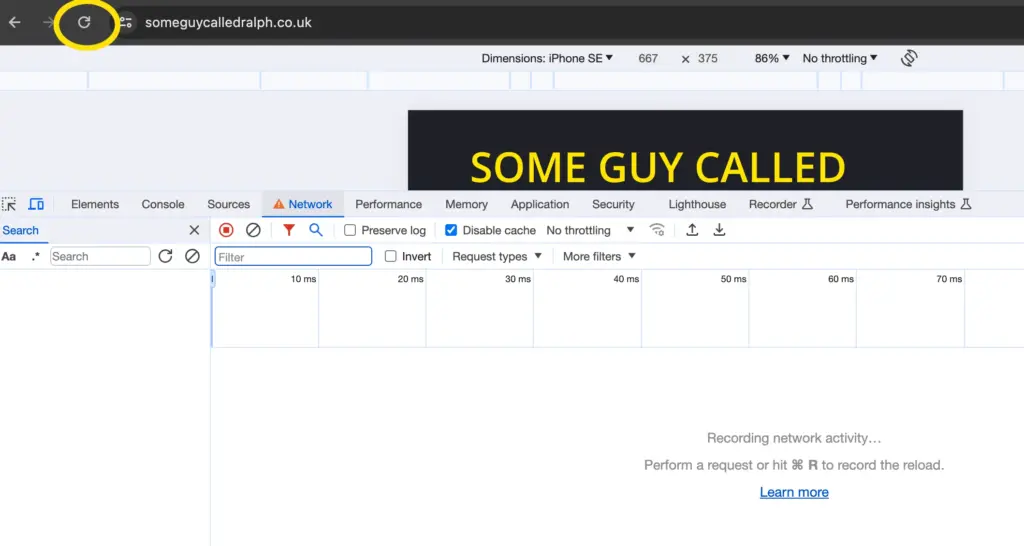
You won’t see much that’s helpful to start with, to capture the network information, you’ll need to refresh the page:
And you’ll then start seeing helpful information in the central portion of screen:
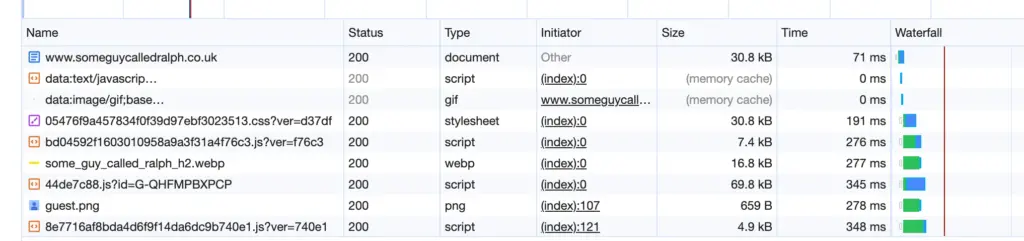
And if we then sort by the “time” column, we can see what’s taking longer to load:

In the screen shot above, we can see that dc1.webp is taking some time to load and also that it’s being called AFTER other resources (that’s the gap to the left of the blue/green bar).
And you can obtain the URL of the image by looking at the page’s source code, and searching for dc1.webp . For example’s sake we’ll assume this image loads from this URL:
https://website.com/wp-content/uploads/2024/01/dci.webp
Consequently, we could use this preload resource hint to make the dc1.webp image start loading much sooner:
<link rel="preload" href="https://website.com/wp-content/uploads/2024/01/dci.webp" as="image" fetchpriority="high">The other aspect of Chrome’s developer tools that’s helpful is the “sources” tab, which can be used to identify resources being loaded from external sources:
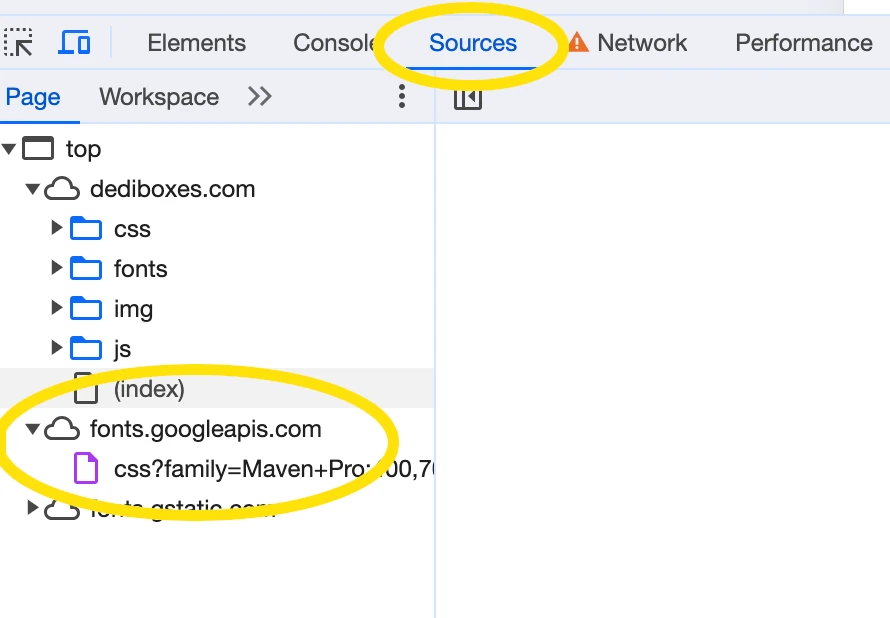
In the screen shot above, we can see that fonts are being loaded from fonts.googleapis.com so we could use the preconnect resource hint to tell the browser to connect to fonts.googleapis.com sooner than it would normally do. You could use something like this to achieve this:
<link rel="preconnect" href="https://fonts.googleapis.com">Mind you, you’d only really want to do this if fonts.googleapis.com is causing a delay in page rendering.
Be sparing with your resource hints. One is advisable, two is pushing it, three is probably going to result in a problem rather than an improvement.