create a child theme in WordPress – A step by Step, how to guide.
How to create a child theme in WordPress. In this post I’ll be talking about why you might want to make a child theme, the benefit of doing so, and I’ll also cover how to make a child theme. The hosting account I’ve used in this guide is cPanel based, so appearance may differ for you if you’re using a different type of hosting.
Why you might want to create a child theme in WordPress.
You’d most likely want to create a child theme in WordPress to allow you to make your own customisations to the overall appearance of your website, with a greater degree of control over how these customisations function.
A child theme can also be used to add custom code level functionality to your site using the functions.php file.
Using a child theme allows you to make these customisations in a manner that will persist if your theme updates (which wouldn’t be the case if you customised your themes files directly).
benefits of using a child theme in wordpress.
Put very generally, using a child theme allows you customise your WordPress in a manner that will persist after updates are applied to the parent theme.
Put more concisely, the benefits you’ll gain by using a child theme are:
- Being able to customise: Customisation gives you a greater degree of control, so using a child theme alone allows you to make your WordPress function in a way that you’d want it to. You could potentially use the customisation options do more than just change a sites appearance. For example, you could use a child theme to do something like make your site’s CSS load in a certain way to address performance issues.
- Styling modifications: You can use a child theme to customise your site’s CSS and therefore gain the ability to define your website’s styling, without relying on what’s available in your parent theme.
- Customisations persist after updates: If you customise your theme directly, when your theme updates these are likely to be lost, so not only does using a child theme prevent this from happening, but it also saves you time as you don’t need to customise your theme over and over again after each update is applied.
- Code Organisation and Readability: Using a child theme promotes better code organisation and readability. Your customisations are contained within the child theme’s folder, making it easier to manage and understand your changes.
- Easy Reversion: If you encounter any issues with your customisations, you can easily switch back to the parent theme to see if the problem persists. This makes troubleshooting and debugging much simpler.
- Future-Proofing: Child themes are forward-compatible, meaning that even if the parent theme undergoes significant updates or changes, your child theme’s customisations are less likely to be affected.
- Custom Functionality: In addition to style modifications, child themes also allow you to add custom functions and features using the functions.php file. This means you can extend the functionality of the parent theme without modifying its core files.
How to create a child theme.
Just to let you know WordPress’ child theme documentation covering this topic can be found here.
Creating a child theme consists of the following steps:
- Create a child theme directory (folder)
- Create a stylesheet: style.css
- Enqueue stylesheet
- Install child theme
- Activate child theme
It would be worth taking a backup before continuing with the above, or at least making sure there’s one available.
Also, in this guide I’m making the child theme files live in my hosting account (that’s how I roll), but you can make them on your computer, then zip them up and install them just like you would a theme.
Create a child theme directory.
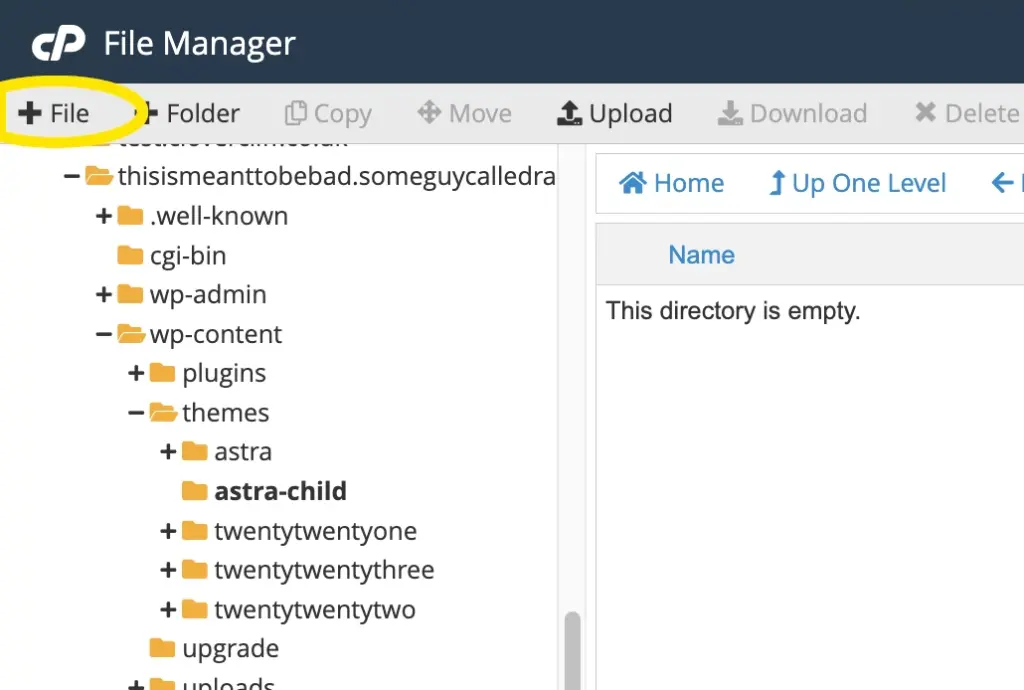
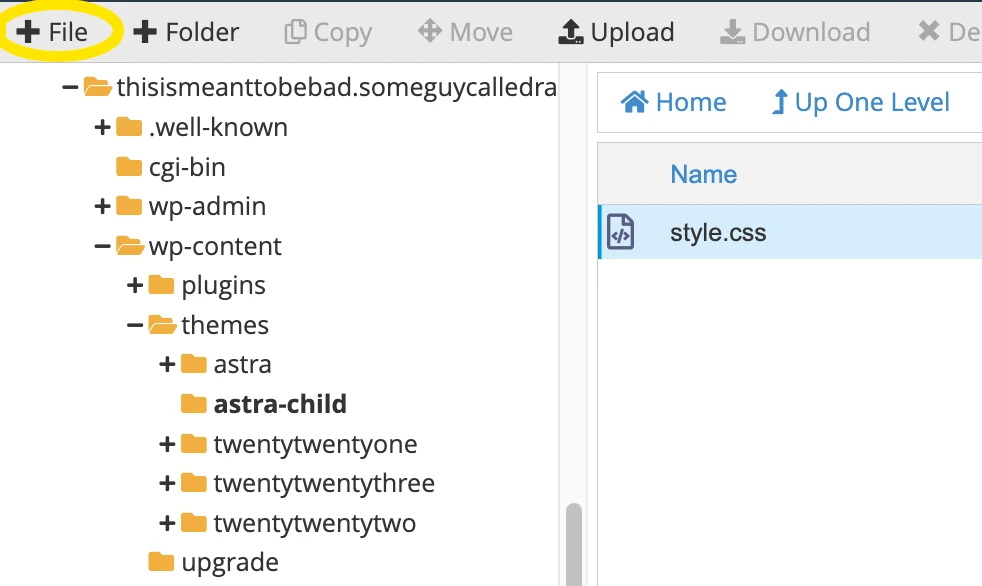
In your hosting account open the file manager, then navigate to:
document_root/wp-content/themes as below:
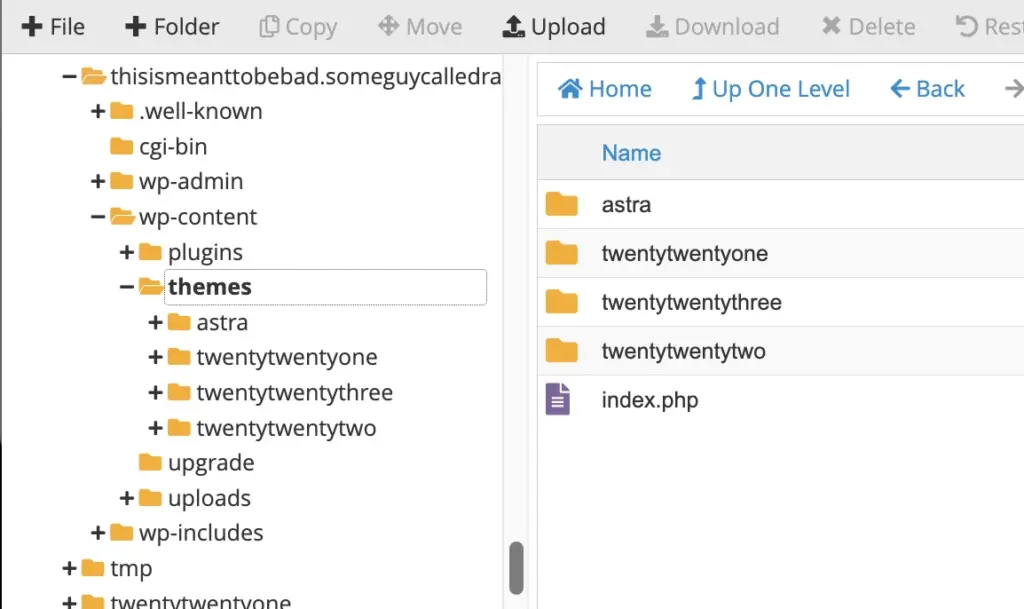
In my themes directory I’ve already got twentytwentyone, twentytwentytwo, twentytwenthree (as WordPress contains these by default on a fresh installation) and astra (which I installed and activated to make it the parent theme that’s in use).
To create the child theme directory click on “+ Folder” at the top:
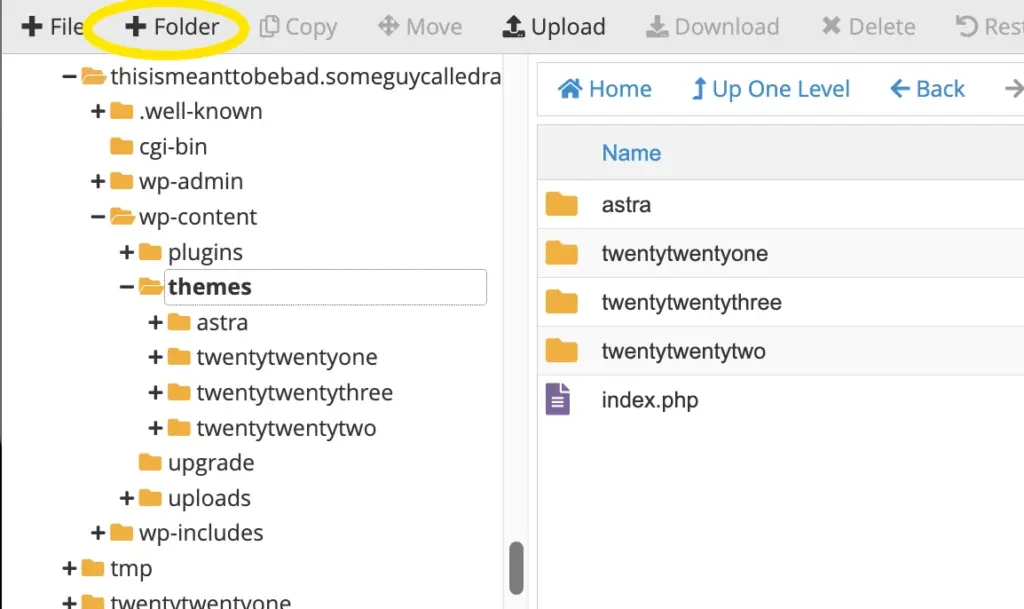
It’s a good practice to give the child theme folder the same name as the parent theme with -child added on the end, so I’m going to call my child theme folder:
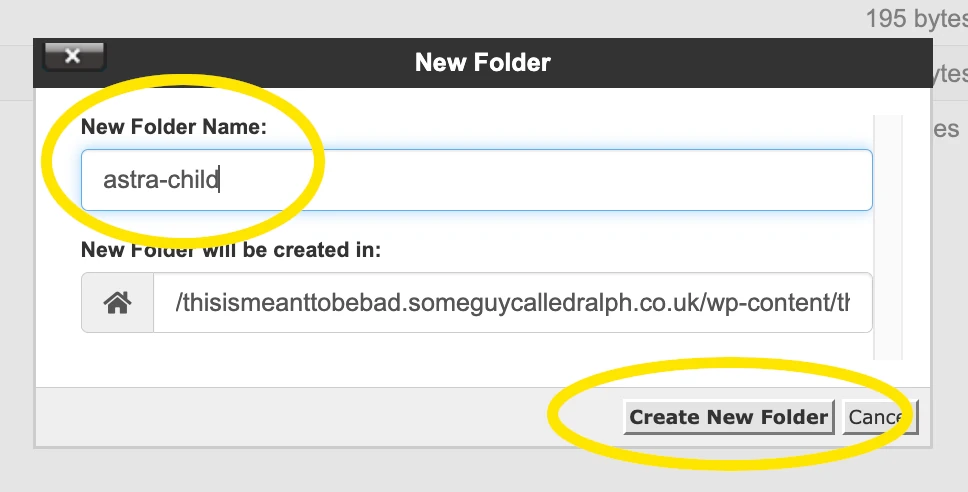
astra-child
As below, and then click the “Create New Folder” to create the child theme directory:
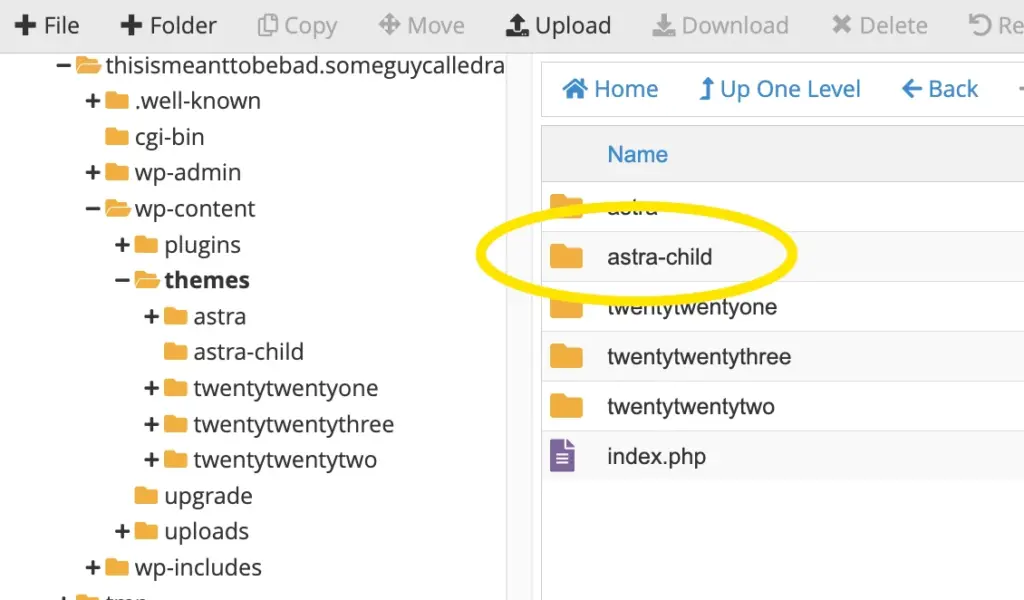
After carrying out the above, you should see the folder you’ve created listed in the file manager in your hosting account:

Create a stylesheet: style.css
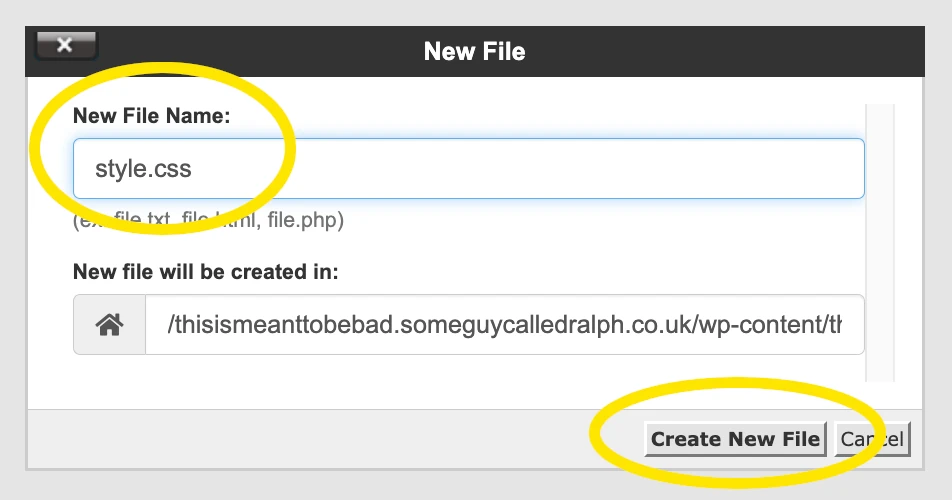
Now we need to create a stylesheet called style.css within the child theme directory, so open the child theme directory by double clicking on it:
And then click on “+ File” at the top to make a new file:
Then give the new file a name of style.css and then click the “Create New File” button:
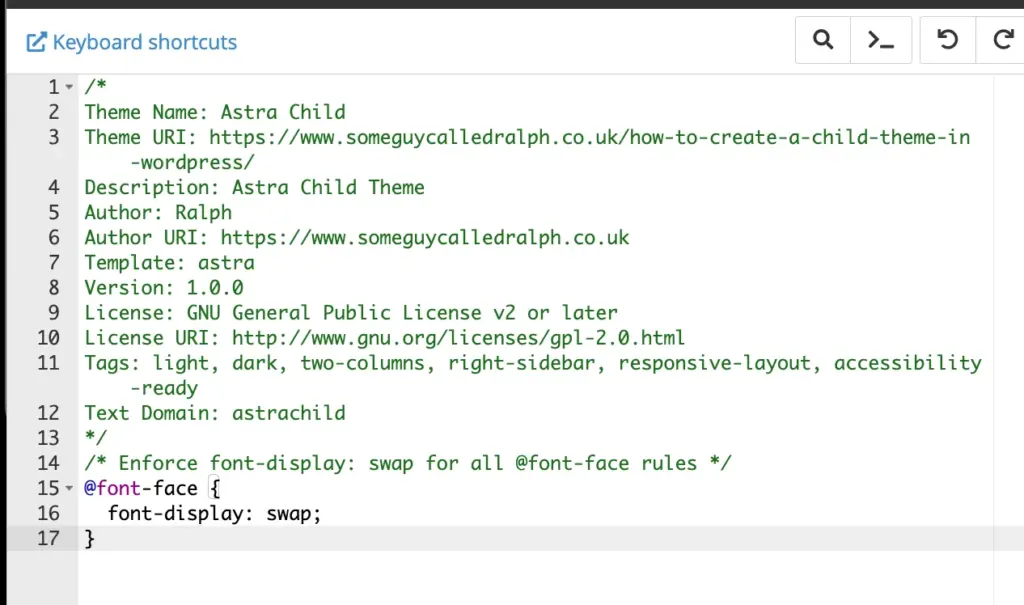
And now we need to add some text to the top of this file to tell WordPress basic info about the theme, including the fact that it is a child theme with a particular parent. The text I’m going to use is as follows (mostly because I’m making a child theme of the Astra theme), you may need to modify this if using a different parent theme:
/*
Theme Name: Astra Child
Theme URI: https://www.someguycalledralph.co.uk/how-to-create-a-child-theme-in-wordpress/
Description: Astra Child Theme
Author: Ralph
Author URI: https://www.someguycalledralph.co.uk
Template: astra
Version: 1.0.0
License: GNU General Public License v2 or later
License URI: http://www.gnu.org/licenses/gpl-2.0.html
Tags: light, dark, two-columns, right-sidebar, responsive-layout, accessibility-ready
Text Domain: astrachild
*/
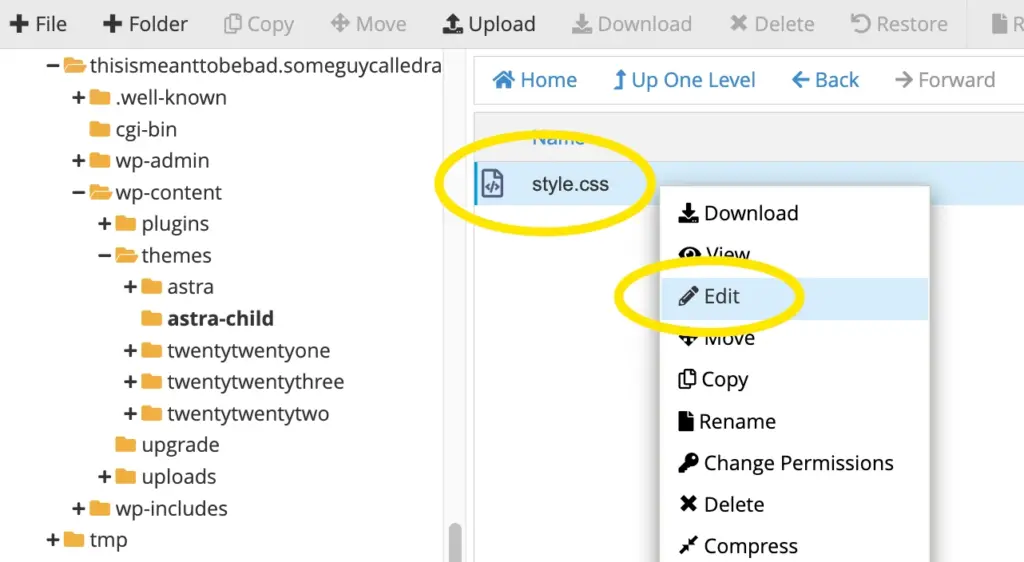
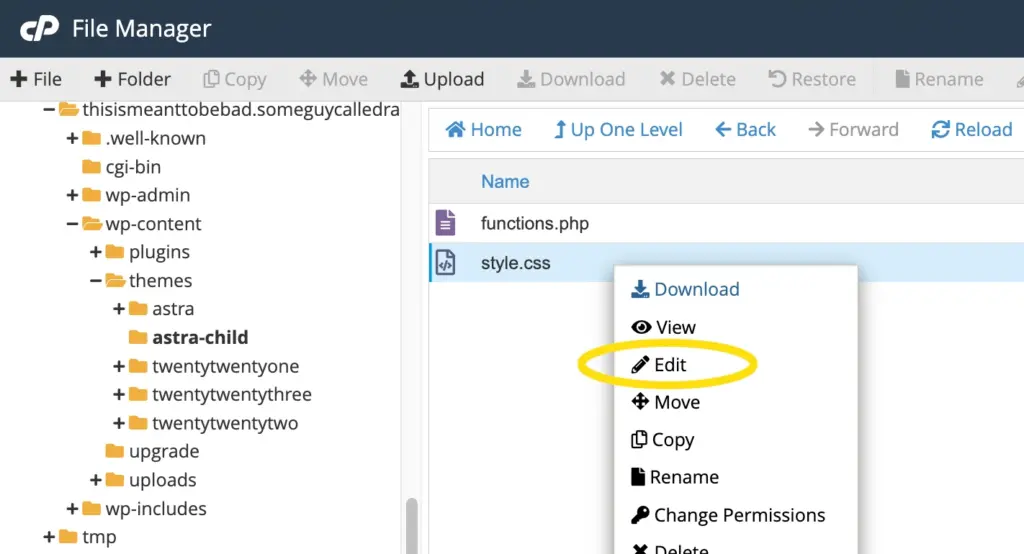
To do this, I’ll need to edit the styles.css file by right clicking on styles.css and the clicking on “Edit”:
At this point I’ve got an empty file:
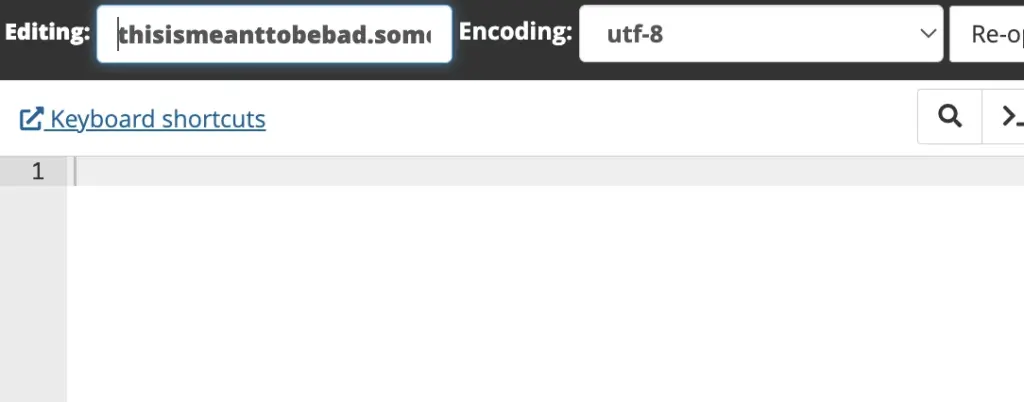
So I now need to add the required text to this file (as mentioned above), and then click the “Save changes” button in the top right hand corner:
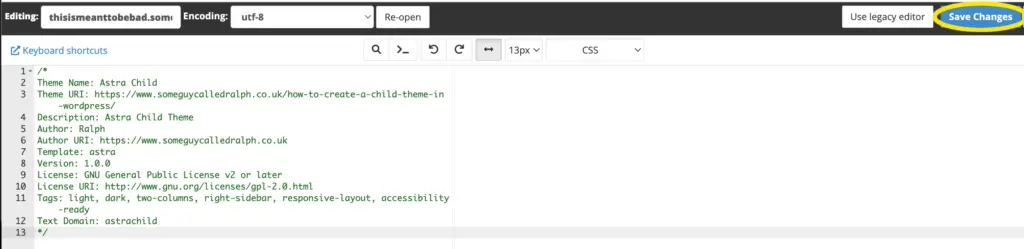
Bear in mind that the text above isn’t actually css, it’s a comment (effectively notes in code) that tells WordPress about the file.
I’ll have to actually add some CSS code to define the stylesheet for my site’s child theme. I’m not going to do this right now, because this is about setting up a child them rather than making CSS.
Enqueue stylesheet.
In the past, the common method used to enqueue the stylesheet was to import the parent theme stylesheet by using @import in the style.css file.
This isn’t recommended these days, as it increases the amount of time it takes style sheets to load. Plus it makes it possible for the parent stylesheet to get loaded twice.
The best way to enqueue stylesheets is for the parent theme to load both the child and the parent’s stylesheet, but not all themes do this. This dictates the need to examine the code of the parent theme to see what it does and to get the handle name that the parent theme uses. The handle is the first parameter of wp_enqueue_style().
With me so far? GREAT! Don’t worry, let’s try and break it down in practical terms.
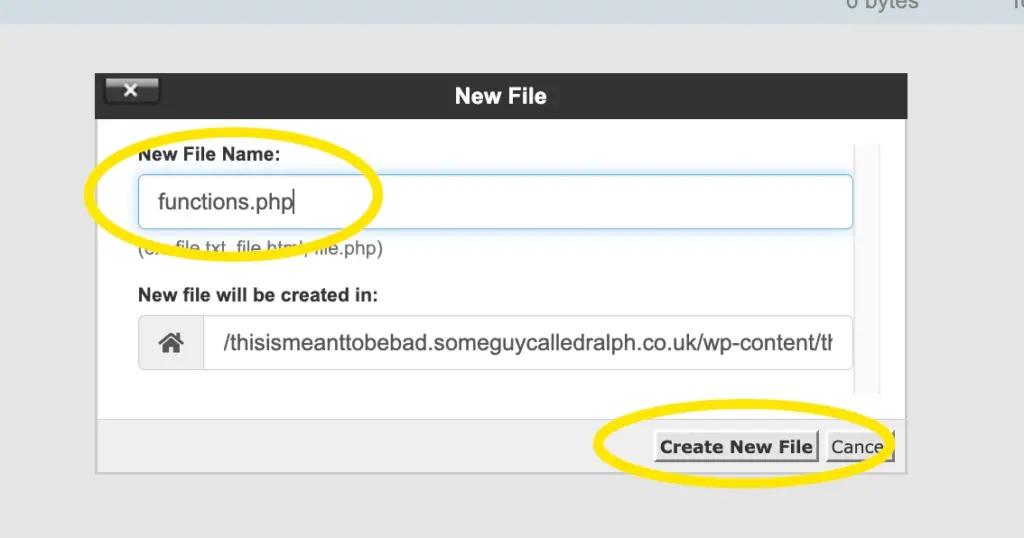
Firstly you’re going to need a functions.php file in your child theme folder, so let’s make one of them by clicking “+ File” in the file manager:
And call it functions.php :
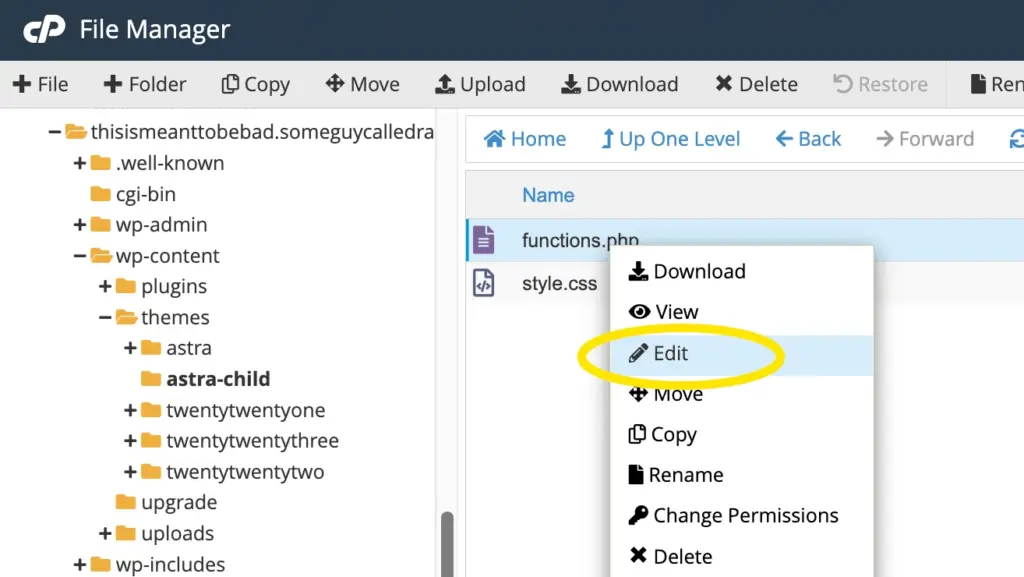
Then edit the functions.php file:
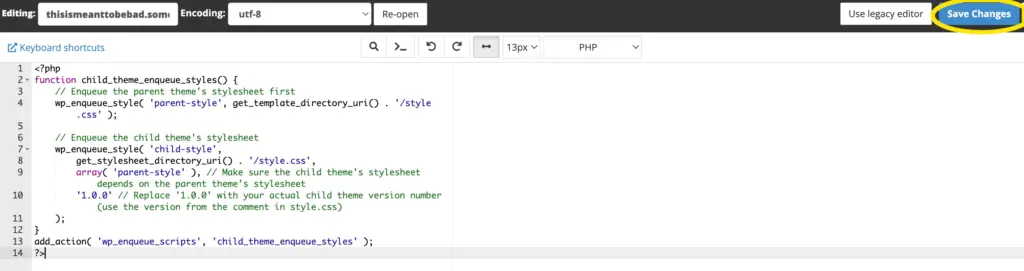
Now we need to add this PHP code to the functions.php file:
<?php
function child_theme_enqueue_styles() {
// Enqueue the parent theme’s stylesheet first
wp_enqueue_style( ‘parent-style’, get_template_directory_uri() . ‘/style.css’ );
// Enqueue the child theme’s stylesheet
wp_enqueue_style( ‘child-style’,
get_stylesheet_directory_uri() . ‘/style.css’,
array( ‘parent-style’ ), // Make sure the child theme’s stylesheet depends on the parent theme’s stylesheet
‘1.0.0’ // Replace ‘1.0.0’ with your actual child theme version number (use the version from the comment in style.css)
);
}
add_action( ‘wp_enqueue_scripts’, ‘child_theme_enqueue_styles’ );
?>
Before we add this, let’s break down what this actually means, for this to make sense, you need to know about some bits in your child theme’s style.css and your parent theme’s style.css which are already in place. In my case, these are in:
For my child theme:
document_root/wp-content/themes/astra-child/style.css
Which contains:
Template: astra
Version: 1.0.0
And for my parent theme:
document_root/wp-content/themes/astra/style.css
What you’ve set in your child theme’s styles.css file needs to be right (specifically the template and the version) for the PHP to run as it should.
The PHP code mentioned above, will enqueue the parent theme’s stylesheet: astra/style.css
Using: get_template_directory_uri()
Which it gets from the “Template: astra” part of document_root/wp-content/themes/astra-child/style.css
And then adding styles.css to the parent theme directory with this: . ‘/style.css’
It then goes on to enqueue the child theme’s stylesheet (‘astra-child/style.css’) as a dependency on the parent theme’s stylesheet by using: get_stylesheet_directory_uri()
And then adding styles.css to the parent theme directory with this: . ‘/style.css’
When I first did this, I thought “how does get_stylesheet_directory_uri() know to use astra-child as the correct directory to load styles.css from?”.
Here’s how. When you activate the child theme in WordPress it becomes the active theme, which in turn bring the child theme’s functions.php file in to effect. So effectively get_stylesheet_directory_uri() has already been defined just by activating the child theme.
So what the PHP code above does is:
The first call to wp_enqueue_style() enqueues the parent theme’s stylesheet using the handle ‘parent-style’. This handle is a custom identifier for the parent theme’s stylesheet.
The second call to wp_enqueue_style() enqueues the child theme’s stylesheet using the handle ‘child-style’.
It then specifies the parent theme’s stylesheet (‘parent-style’) as a dependency so that the parent theme’s stylesheet is loaded before the child theme’s stylesheet.
Both stylesheets will be enqueued in the proper order and applied to your website, with the child theme’s styles overriding any conflicting styles from the parent theme.
At this point you might wonder why you want the parent theme’s stylesheet to be loaded before the child theme’s stylesheet. I did.
Child themes are designed to inherit styles, templates, and functionalities from the parent theme. By loading the parent theme’s stylesheet first, the child theme can override specific styles and templates as needed. This means that any styles defined in the parent theme can be modified or replaced in the child theme’s stylesheet.
And you know what that means don’t you? It means you can use the child theme’s styles.css to bring font-display: swap; in to effect globally, which addresses the “ensure text remains visible during webfont load” issue flagged in https://pagespeed.web.dev/ (which is pretty much what prompted me to write this post in the first place).
Anyway, let’s not get too ahead of ourselves. Add the PHP above to the functions.php file, then save it:
Well done, that’s the hard part done.
install child theme.
If you made the functions.php and styles.css files on your computer instead of making them in your hosting account (like I did above) you now need to install them.
If you followed this guide like for like, then you don’t need to install the child theme (it’s technically already installed) so you can move on to Activate Child Theme.
If you did make the functions.php and styles.css files on your computer what you need to do now is make a directory (folder) that’s named suitable (such as parentthemename-child – in my case astra-child), then put the styles.css and functions.php in this folder, then zip the folder and you should end up with a zip file called parenthemename-child.zip .
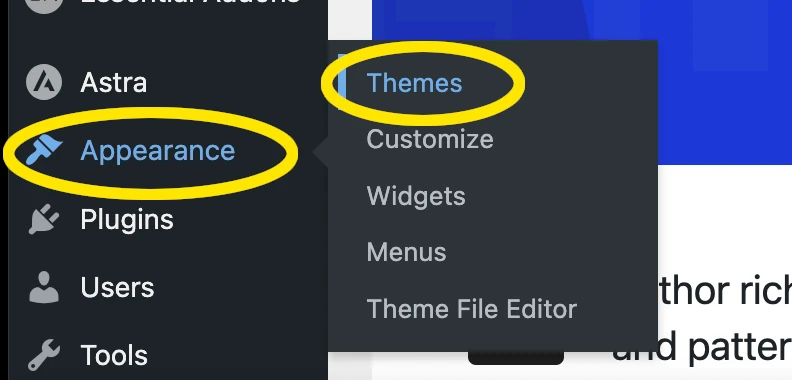
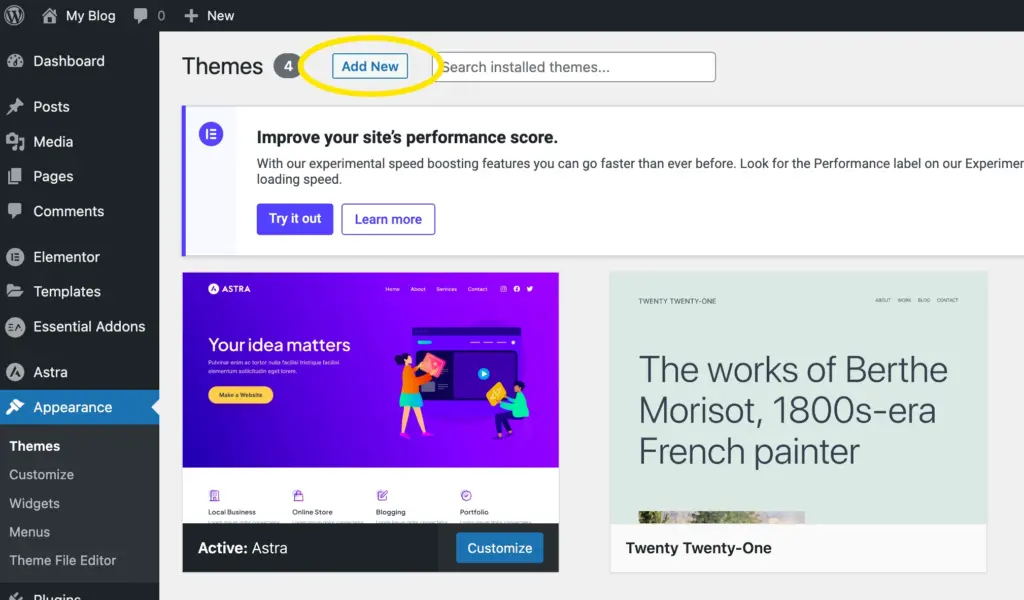
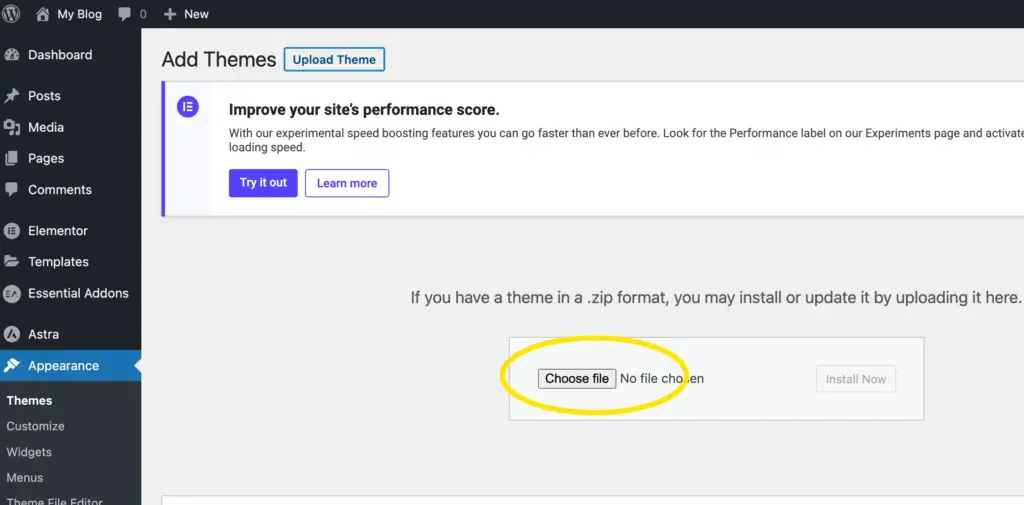
You’d then use the zip file you’ve created to install the child theme. To do this in your WordPress dashboard hover over “Appearance” in the menu on the left hand side, then click “Themes”:
Then click on “Add new” up at the top:
Then click on “Upload Theme” up at the top:
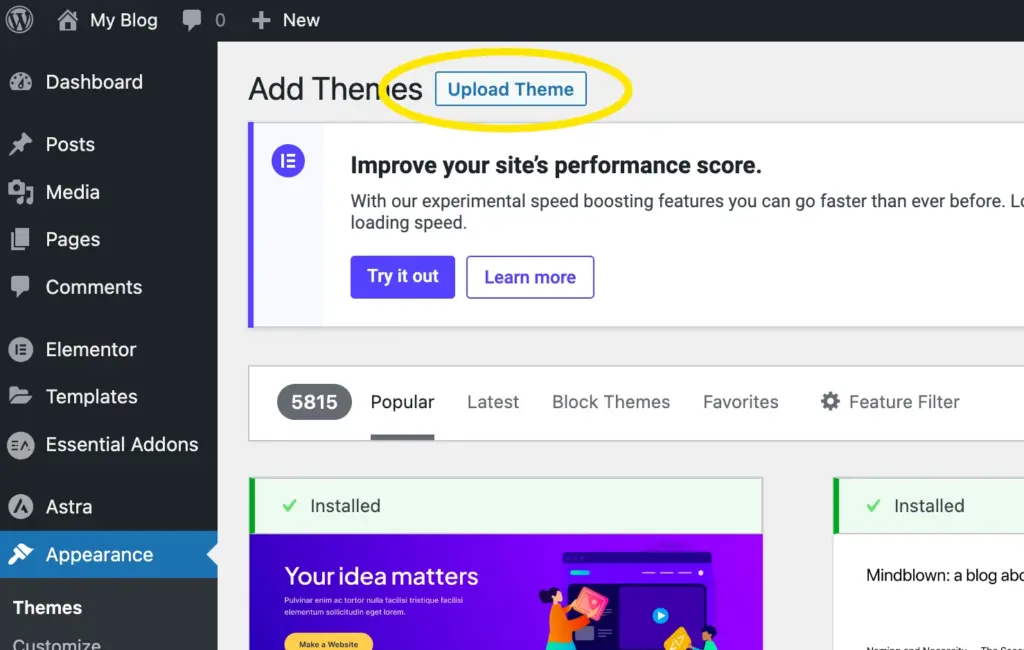
Then click on “Choose File”:
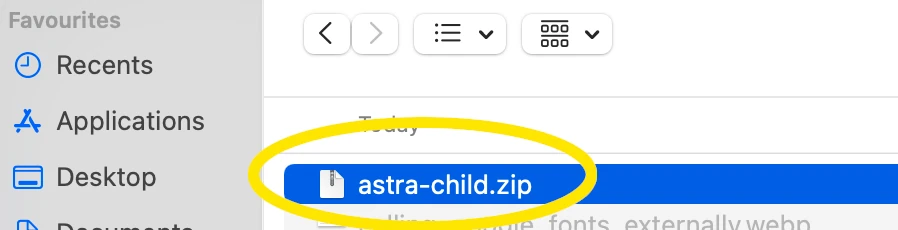
Then browse to and double click on the zip file you created:
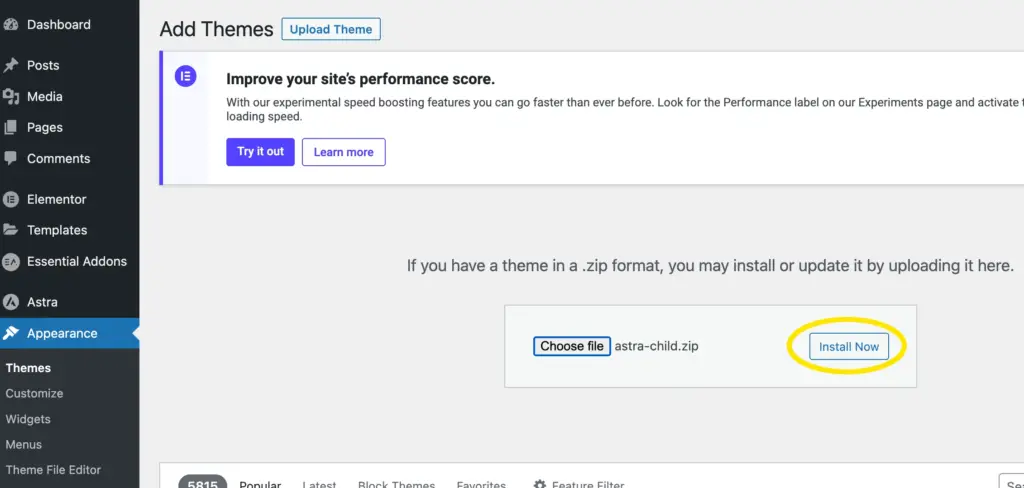
Then click on “Install now”:
And you should see this:
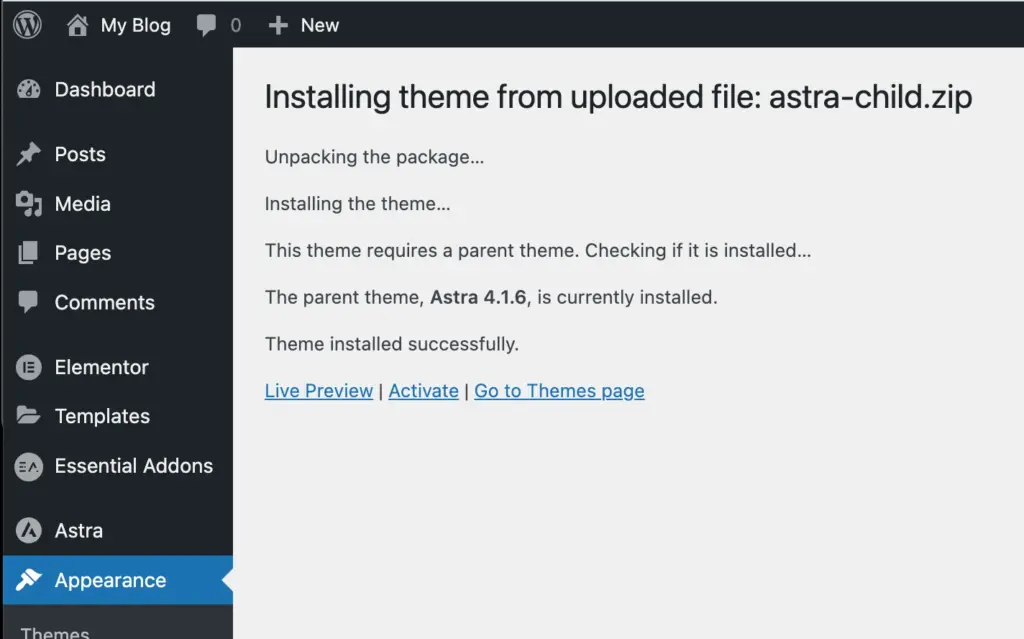
As you can see, WordPress has checked for the parent theme, found it, and then installed the child theme you’ve created successfully. You can simply click “Activate” to activate your child theme, and skip the step below, as you’re done!
Activate child Theme.
If you made your theme live in the cPanel file manager, you now need to activate your theme, to do this, hover over “Appearance” in the menu on the left hand side of your WordPress dashboard, then click on “Themes”:
And then hover your mouse over the child theme, and then click on “Activate” in the child theme section:
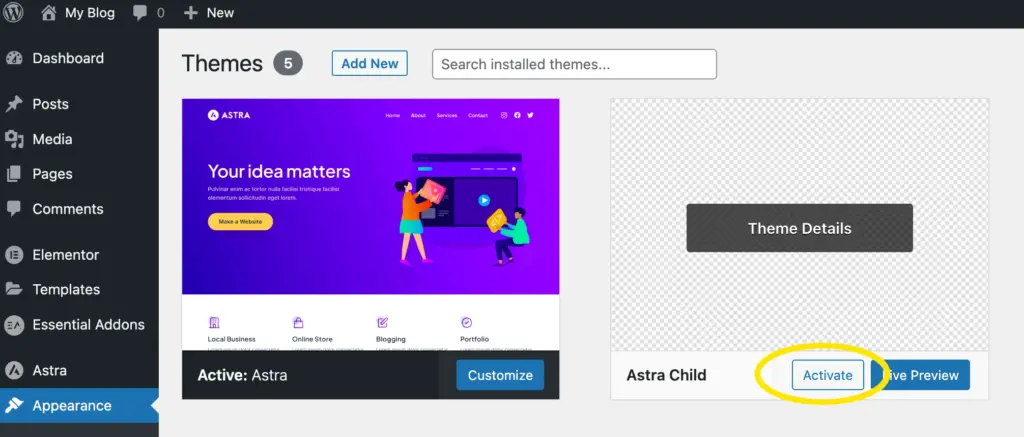
And you’re done! Congratulations, you’ve just created and deployed a child theme in WordPress.
If you got here to find out how to globally enforce font-display: swap;
If you got here to find out how to use a child theme to globally enforce font-display: swap; there’s one more thing that you need to do to bring this in to effect.
You need to add some CSS to your theme’s style.css file.
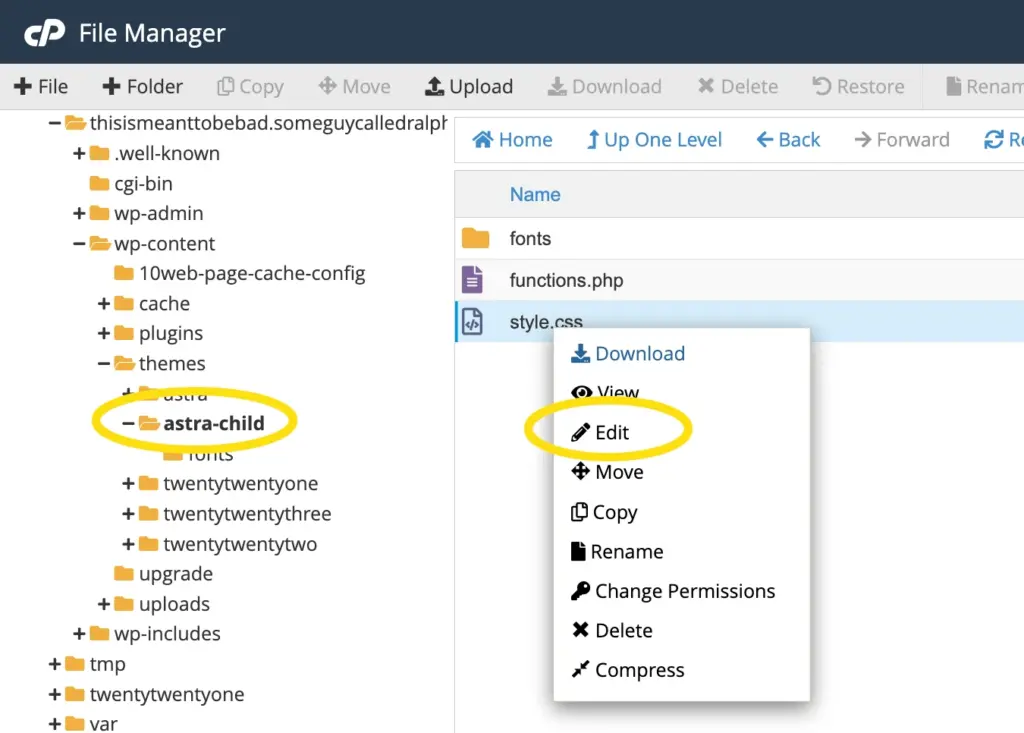
To do this browse to the location of your child theme’s style.css file, then right click on the style.css file and click on “Edit”:
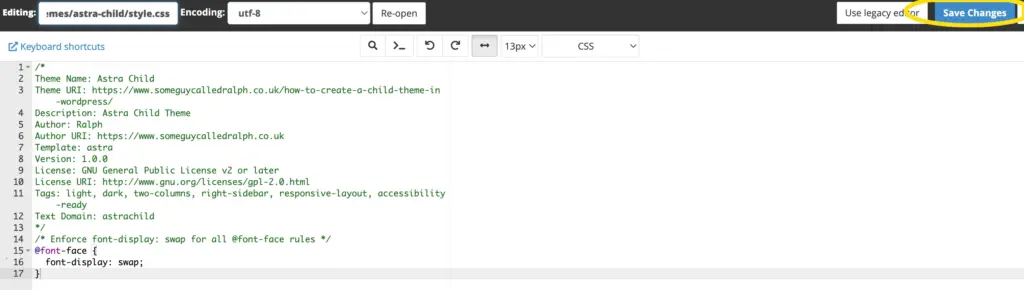
And then add this code under the commented area at the top:
/* Enforce font-display: swap for all @font-face rules */ @font-face{
font-display: swap;
}
Like this:
And then save your changes:
Now do bear in mind this is a bit of a dirty fix, and the correct way to do it would also be to define the paths to your font files, which you’d do by using something like this:
@font-face{
font-family: ‘YourFontName’;
src: url(‘path/to/your-font.woff2’) format(‘woff2’),
url(‘path/to/your-font.woff’) format(‘woff’);
font-display: swap;
}
It’s not as difficult as it sounds to do this.
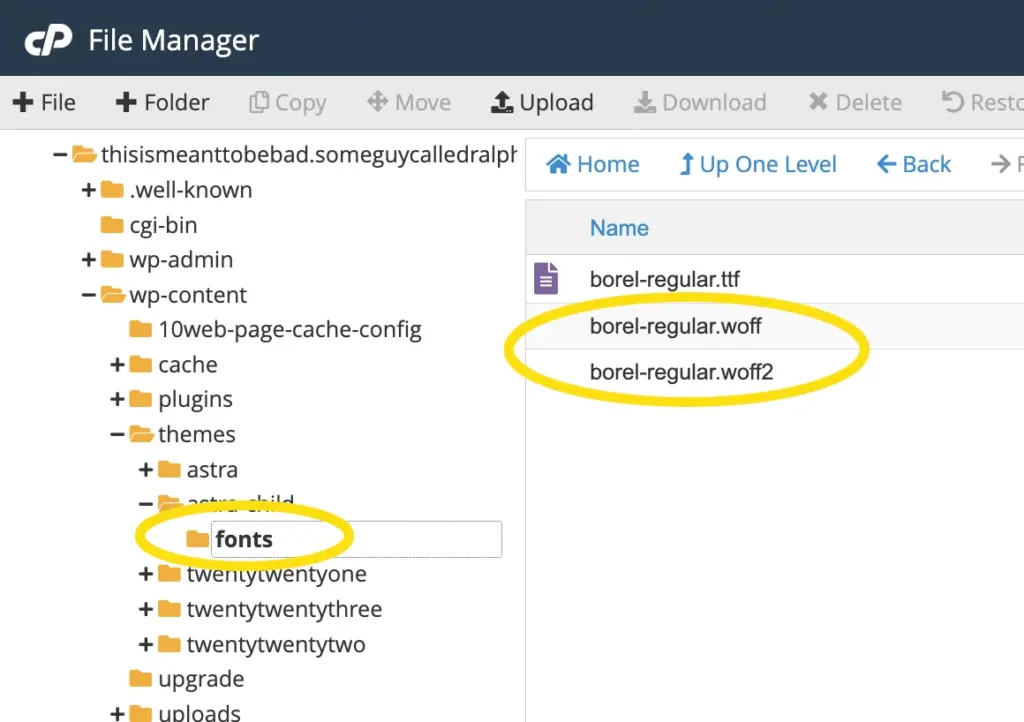
Let’s say you’ve obtained 2 font files: borel-regular.woff2 and borel-regular.woff
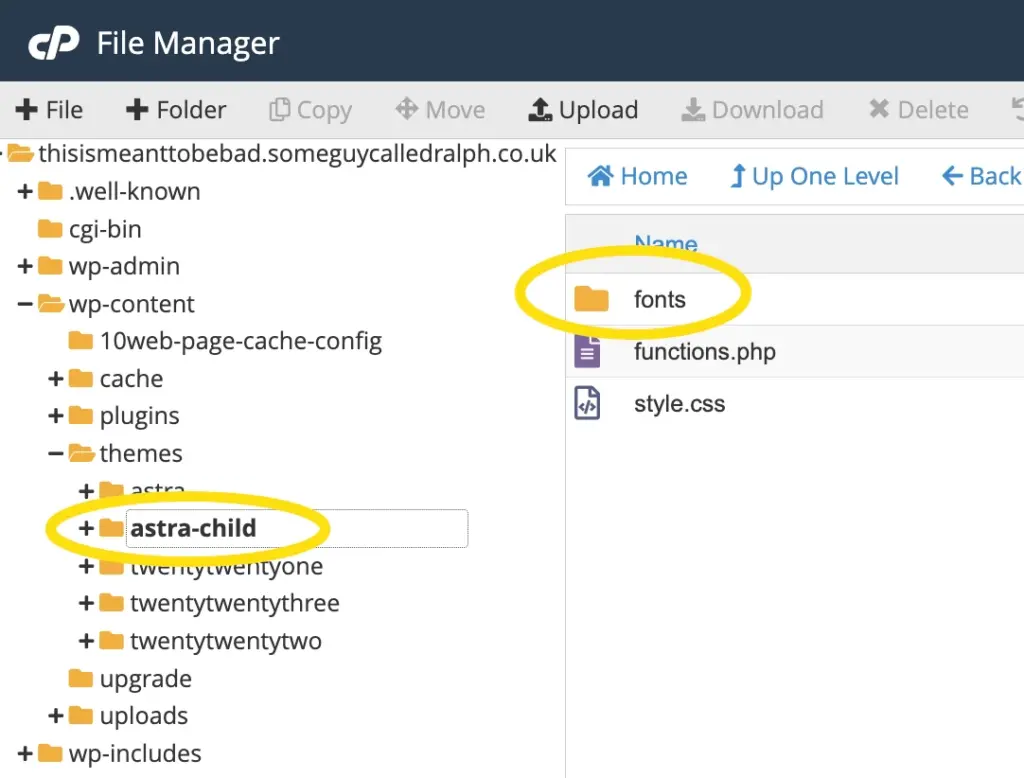
Within your child theme directory, you’d then create a directory called fonts:
and then upload the borel-regular.woff2 and borel-regular.woff files to the fonts directory:
Then, to call these fonts, you’d edit your child theme’s style.css file:
And then add the following to the style.css file:
@font-face{
font-family: ‘borel-regular’;
src: url(‘fonts/borel-regular.woff2’) format(‘woff2’),
url(‘fonts/borel-regular.woff’) format(‘woff’);
font-weight: normal;
font-style: normal;
font-display: swap;
}
/* Apply the font to the following elements */
body, p, h1, h2, h3, h4, h5, h6 {
font-family: ‘borel-regular’, sans-serif;
}
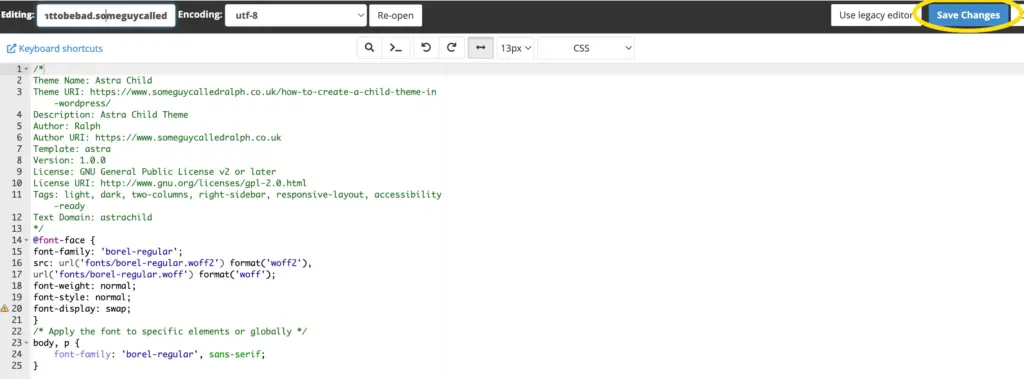
The borel-regular font will then be applied to body, p, h1, h2, h3, h4, h5, h6 falling back on sans-serif, using font-display: swap; when doing so.
The path to the font files are defined in a relative manner (relative to where the style.css file is) hence the full file path not being used and there being no preceding / on the file path (that would make it an absolute file path so the fonts would be called from an incorrect location.
You could upload different font files and replace borel-regular.woff2 and borel-regular.woff in the CSS above with the file names of the fonts you upload.
Common problems might be:
- Incorrect paths to font files (if the font files are held in the fonts directory, and the fonts directory is in the same directory as style.css the path is fonts/filename.woff or fonts/filename.woff2).
- Child theme isn’t active. You can activate the child theme in the WordPress dashboard in Appearance > Themes > Activate (in the child theme section).
- Font name in CSS.
- Specificity. The above uses body and p tags in the example, which are “type” selectors. If your sites page output calls CSS using class selectors (these start with a full stop) you’ll need to add these in to your child theme’s style.css file for them to be applied.
- Ensure that the font-family name you specified in the @font-face rule matches exactly with the name you’re using when applying the font in your CSS (see lines 15 and 24 on the screen shot above)
- Caching. You may need to clear BOTH browser caches and the caches generated by any caching plugins bing used in your WordPress to see the changes in effect.
- Mixed Content Issues. If your website is using HTTPS, make sure that the font files are being loaded using HTTPS URLs. Mixed content (loading insecure resources on a secure page) can sometimes lead to font loading issues. If you’re using relative, rather than absolute paths for the font files in CSS this shouldn’t be an issue.
- Server Permissions. Ensure that the font files have the correct permissions on your server (644), allowing them to be accessed by the browser.
- Theme and Child Theme Relationship. Ensure that you are editing the correct style.css file in your child theme and that the child theme is active on your WordPress site.
- Other CSS Rules. Check if there are any conflicting CSS rules that might be affecting the font rendering. Sometimes, other CSS rules can override the font settings Using the !important CSS attribute upstream may cause this).
- Browser Compatibility. Test the website in different browsers. Sometimes, font rendering can vary between browsers.
- Errors in CSS. Make sure there are no syntax (spelling) errors or typos in your CSS code. A single typo can break the entire rule. You can use online CSS validators to check your CSS syntax.
In conclusion.
- Creating a child theme can seem excessive, but it does put you in control of the CSS your WordPress uses.
- You need a knowledge or understanding of file paths, creating files and editing files within your hosting account to be able to deploy a child theme.
- The functions.php file can be created based on the template above, and an understanding of how this functions allows you to create the child theme.
- You’ll have to obtain font files for them to be uploaded to your hosting account.
- You need a knowledge or understanding of CSS to be able to manually create CSS files, and therefore bring the fonts in to effect.