How to Migrate a WordPress Site
In this post I’ll be talking about how to migrate a WordPress site.
I’ll be covering how to migrate a WordPress site from one hosting account to another, using the cPanel hosting platform. This is essentially copying a WordPress installation from one hosting provider to another.
Although I’ve focussed on using cPanel, the method is the same for most other standard hosting providers.
Why you might want to migrate a WordPress site?
There are various reasons why you might want or need to migrate a WordPress site.
Usually people want migrate a WordPress site to change who their site is hosted with. The reasons for this are quite variable, a few examples of the reason behind this might be:
- Moving to a cheaper hosting provider (as a cost saving exercise).
- Moving to a hosting provider that offers more powerful or better performing hosting (to improve site performance).
- The end of a contract.
- To unify where services are held (to operate EMail services and the webite using the same hosting provider)
People aren’t always going to want to move their site for the same reason so this is by no means an exhaustive list.
Different ways of migrating a WordPress site.
There are a couple different ways that a WordPress site can be migrated:
- Using a plugin.
- Manually migrating.
Each of these have advantages and disadvantages.
How to migrate a WordPress site using a plugin.
Using a plugin such as updraft or all in one wp migration are quite easy to use, but there are implications, which I’ll get to in a moment.
The approximate process for moving a site using updraft or all in one wp migration is:
- In the source wordpress installation, install updraft or all in one wp migration.
- Use updraft or all in one wp migration to generate a backup or export.
- Download the backup or export file.
- Repoint your domain’s DNS to the new provider.
- Install WordPress in the hosting account with the new provider.
- Within the WordPress with the new provider install updraft or all in one wp migration (depending on which you used to make the backup).
- Import and restore the backup/export using the respective plugin.
That sounds fairly easy doesn’t it? The ease of operating in this manner, is the major advantage to plugin based migrations. Why wouldn’t you migrate in this manner?
PHP. Thats why.
Pretty much all of the actions mentioned above are done “in WordPress” and via a web browser. This means that you’re using the underlying PHP that the WordPress installations are running to generate backups or export files, and you’re then using WordPress (on the destination installation) to import the export or backup file. You’re also using PHP to unpack the export or backup, to recreate your site.
Whilst this probably sounds OK so far, now bear in mind that PHP is highly likely to have deliberate limitations.
Some of these limitations you’ll be able to control using a php.ini file (cPanel has a php.ini editor that’s a bit friendlier to use, as opposed to manually creating and administering a php.ini file yourself), such as memory_limit, post_max_size and max_input_vars which you might need to increase the be able to carry out the generation of an export or backup, and to be able to import and recreate your site using an export or backup that’s been generated using a plugin.
You’ll have to experience a failure, then examine erorr logs, possibly enabling debugging in WordPress when doing so. You’ll need to do this to establish what php.ini directive you’ll need to adjust.
At this point you might be thinking something along the lines of “that doesn’t sound quite as easy”.
If you also take in to account that some hosting providers also have limits that you can’t override that might cause problems with a backup based export/import, it’s even less easy. In some cases, limits of this nature will prevent you from being able to carry out a plugin based export/import.
You might wonder why hosting providers have limits of this nature. It’s essentially because of shared hosting environments (lots of hosting accounts belonging to multiple different customers being held on one server). The types of limits that I’ve just mentioned are in place to stop one customer monopolising server side resources or using them to the degree (inadvertently or otherwise) that would cause problems for other customers held on the same server.
Identifying and addressing php.ini based limitation issues, and the intentional limitations hosting providers enforce are the disadvantages to using a plugin based migration.
How to migrate a WordPress site manually.
The advantage of manually migrating is that this doesn’t use PHP, so isn’t subject to the limitations defined by hosting providers or in php.ini directives. Due to this, a manual migration is less likely to fail, or be problematic in the same way that a plugin based migration is.
The disadvantage to manually migrating is that it’s harder, that you need an approximate understanding of how WordPress works, and you’ll also need to know:
- How to create databases and database users.
- Have an understanding of document roots.
- Understan how WordPress connects to a database.
Whilst this might sound a bit daunting at first, it’s not too difficult and after you’ve done it once, you’ll find it easier should you have to do it again in the future.
The rough process you’d carry out to manually migrate in this manner (don’t worry, I’ll go in to this in more detail below):
- Download your site files from the source provider.
- Download a copy of the site’s databse from the source provider.
- Upload the site files to the document root of your domain with the destination provider.
- In the gaining provider’s hosting create a datbase and a database user, then…
- Assign the user to the database (granting all priveleges when doing so).
- Edit the wp-config.php in the document root of the domain with the gaining provider and update it with the database name, datbase user, and database user’s password (that you created in step 4).
- Import the database downloaded in step 2 to the database created in step 4 (again in the gaining provider’s hosting).
- Repoint your domain’s DNS.
How to migrate a WordPress site manually, step by step.
It’s a lot easier if you break things down in to steps when it comes to migrating a wordpress site, so that’s what we’re going to do now.
In the examples given below, I’m using cPanel. If you’re using a different type of hosting, the appearance and how you do things may differ a bit, but the process is roughly the same.
1. Download a copy of the WordPress site files from the source hosting provider.
As migrating a WordPress site involves downloading and uploading files, we’re going to compress the entire WordPress installation in to a singular Zip file. Not only does this mean that the total amount of data that you download and upload is less, it also means that you only have to download and upload one file, not several thousand.
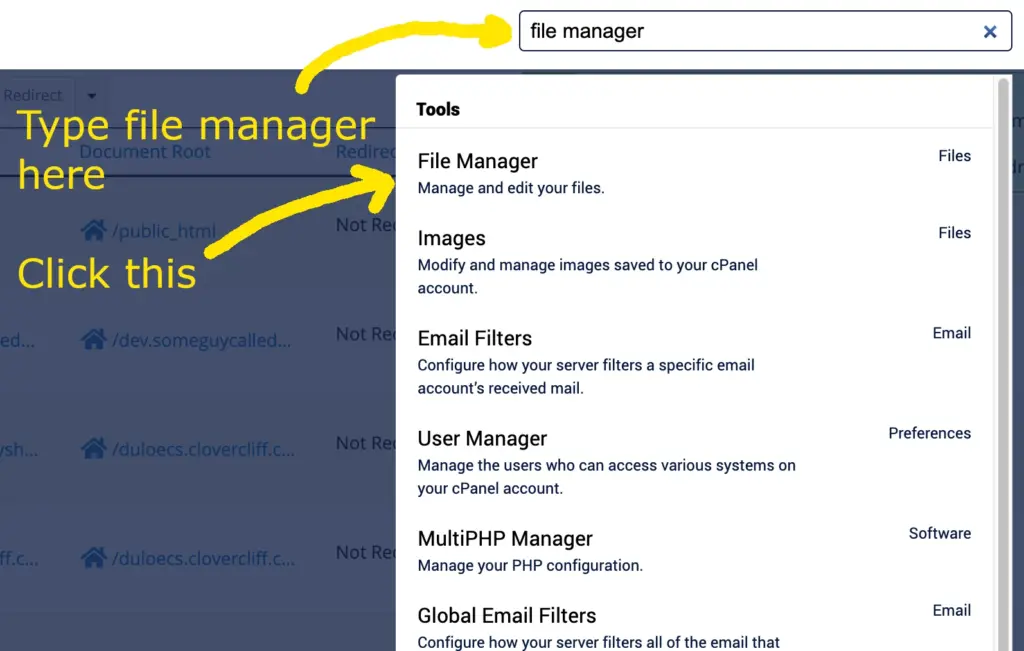
The first thing to do is zip up the existing site files. To do this open the cPanel file manager and navigate to the document root of your domain. If you’re using single domain cPanel hosting the document root is public_html by default, but this may differ if you’re not using cPanel or have a multi domain type hosting.
In your cPanel, open the file manager:
Then navigate to the public_html directory:

Then select all the WordPress files by clicking on the uppermost folder starting with wp- holding the shift key on your keyboard, then select in the file at the bottom of the list, and you should end up with this:

Now right click on a selected (blue) are and you’ll see a menu appear. From this menu, click on “compress”, like this:

In the pop up that appears, select “Zip” then click “Compres files”, like this:

When the compression finishes, another window will be displayed, click close:

And you’ll then be back to the cPanel file manager. If you look at the list of files, you’ll see one that ends in .zip. This is the compressed archive of all your site files that you’ve just created. Right click on this, then select “download”, like this:

Once the download has compelted, you’ve got a copy of the site files on your computer.
Keep the cPanel file manager open for now, you’re going to need it for the next step.
2. Download a copy of the site’s database.
The next step is to download a copy of the site’s database. Before we can do this, we need to know which database to download.
The wp-config.php file defines the database that the site connects to, so locate the wp-config.php file, then right click on it, and select “view”. Again, you’re doing this in the cPanel file manager, and the wp-config.php will be in the document root of your domain:

The wp-config.php file will then be displayed. Locate the line that starts with “define( ‘DB_NAME'” and make a note of the part after “define( ‘DB_NAME'”, like this (I’ve blurred part of mine out, for security). This is the database that the site uses:

Now, to download a copy of this database, go back to the main cPanel page, and click on “backup”:

Then in the “Download a MySQL Database Backup” section, click on the database that matches the name of the database in the wp-config.php file:

That’s it for downloading, you now have a copy of the site files and the database on your computer. Now its time to upload the site files and datbase to the gaining provider.
3. Uploading the site files to the new/destination hosting provider.
So again, I’ll be using cPanel for this example. To upload your site files, log in to the hosting with the new provider that you’re moving to and navigate to the document root of your domain. If you’re using single site cPanel hosting the document root will be public_html. In my examples mine is different because I’m using a subdomain for this example.
Again, open the cPanel file manager:
Then navigate to the document root of your site (you’ll need to navigate to public_html if you’re using single domain cPanel hosting, rather than matching what I have in my screen shots):

Then click on “upload” at the top:

Then click on “Select File”:

Then browse to, and upload the zip file you downloaded earlier:

You’ll then need to wait for the upload to complete (wait for the bar at the bottom to go green):

Then go back to the cPanel file manager and you should see the zip file that you’ve just uploaded. Right click on this, then click on “Extract”, like this:

Then confirm the extraction by clicking on the “extract” button:

Once the extraction has completed, you’ll then see this window, you can just click the “close” button:

And you’ll then see all the extracted files:

That’s the site files copied over to the new provider, now we just need to sort out the database, then connect the files and the database.
4. Create a database in the new provider’s hosting.
Again, this is cPanel specific so what you’ll need to click on will differ if you’re using a different type of hosting. The steps you’ll need to take are the same, though.
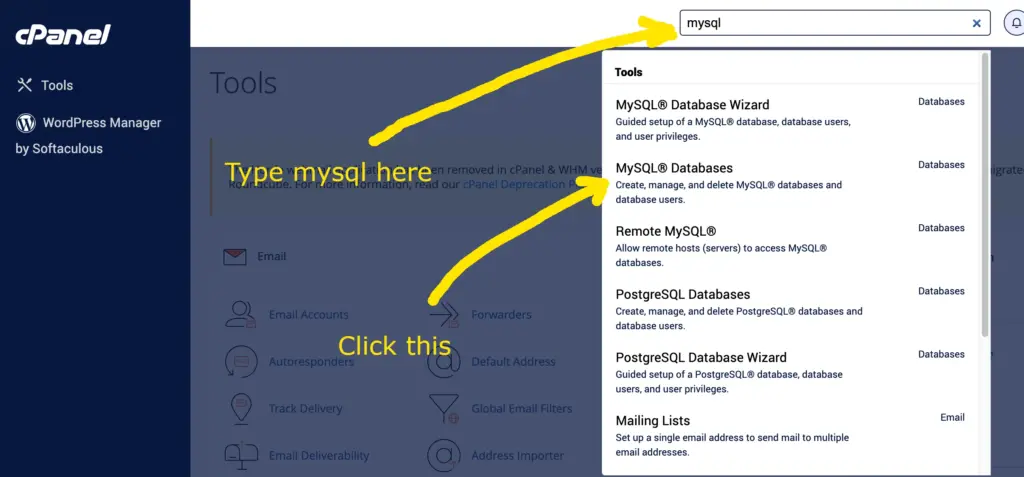
In cPanel navigate to the ‘MySQL databases” section:
In the “create a new database” section, enter a name for the new database. Make a note of the FULL database name (you’ll need this to update the site’s wp-config.php file shortly), including the part BEFORE the underscore. Once you’ve entered a name, click “create database”:

You now have a new, empty database. We’ll import the database downloaded from the source provider in a moment, but first we need to…
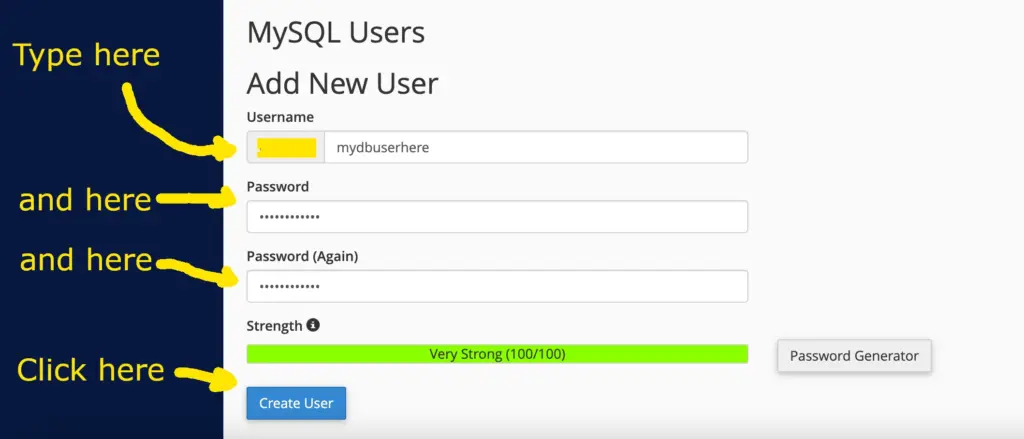
5. Create a database user in the new provider’s hosting.
Still in the MySQL Databases section of cPanel, locate the “Add new user” section, and enter a name for the user (again make a note of this INCLUDING THE PART BEFORE THE UNDERSCORE as we’ll need it to update the site’s wp-config.php file shortly), enter a password again, making a note of this when doing so. Once you’ve entered the username and the password and made a note of both, click “create user”, like this:
At this point, you have a database and a database user, and you’ve made a note of the database name, the datbase username and the database user’s password. There’s one final thing that we need to do in the MySQL databases section of cPanel, and thats to assign the newly created user to the newly created database.
The reason we need to do this, is to give the user the ability to use the database. We’re instructing MySQL that the user can use this database, and what the user can do to the database.
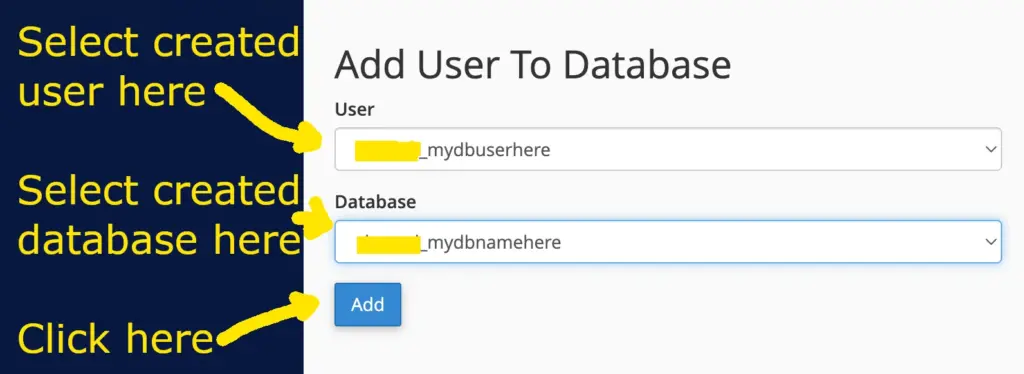
6. Assign the user to the database in the new provider’s hosting.
Still in the MySQL Databases section of cPanel, locate the “Add user to database” section, and in the “user” drop down, select the user you’ve just created and in the “database” drop down select the database you’ve just created, then click on “Add”, like this:
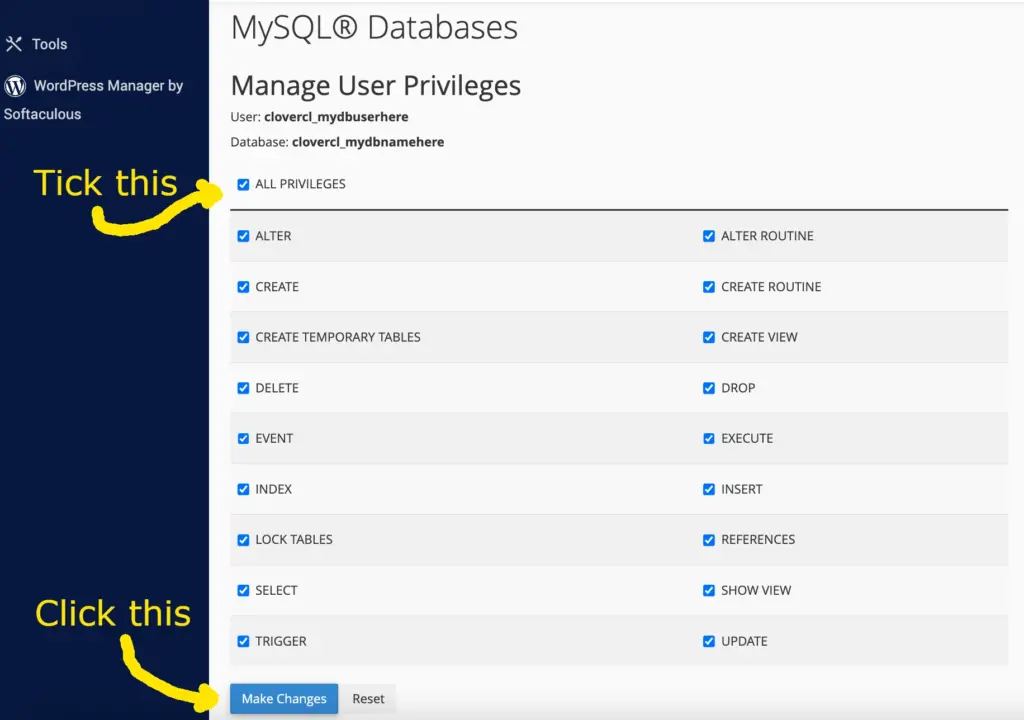
You’ll then be presented with the priveleges (or rights) that the user has when using the database. This defines what the user can and can’t do to the database. For simplicities sake tick “all privileges”, then click “make changes” like this:
So that’s the databse and the database user set up, and the user has been assigned to the database.
At this point the database is still empty. So now we need to…
Import the database from the source provider to the empty database with the new provider.
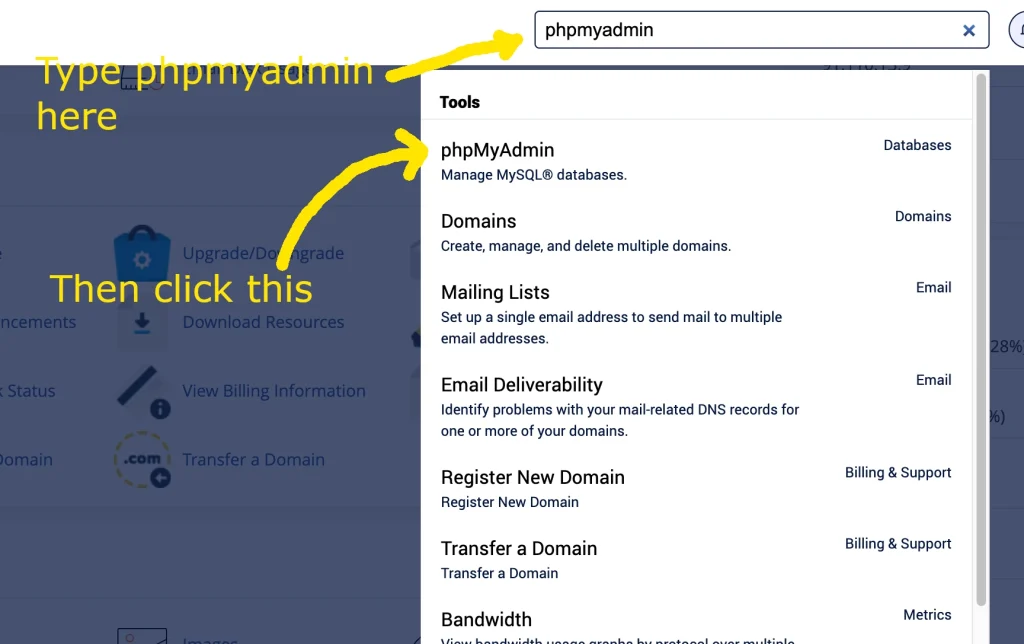
We’re going to use PHPMyAdmin to do this, which is available in cPanel by default. PHPMyAdmin is also available in lots of other types of hosting as well, so you may well be able to use this, even if you’re not using cPanel. Again, if you don’t have PHPMyAdmin available, you’ll still need to import the database you downloading from the source provider, in to the empty database you’ve just created.
Go back to cPanel’s main page, and navigate to PHPMyAdmin:
Then on the left hand side, click on the name of the database (you may need to click the + next to your cPanel username to see this) that you’ve just created:

Then, in the row along the top, click on “import”:

Then click on “choose file”:

Then browse to, and double click the database that you downloaded from the source provider:

Then click the “import” button at the bottom of the page:

Then you’ll need to wait for the import to complete, and once it has you’ll need to make a note of the table prefix. Again, this is needed to update the wp-config.php file.
You can locate the table prefix by looking at the expanded database in PHPMyAdmin. The table prefix is the letters AND THE UNDERSCORE that’s in place at the beginning of all table rows. As mine looks like this:

I can tell that the table prefix for my database is:
wp_
Yours may differ, so take a look and make a note.
There’s one final piece of information we’ll need to obtain from PHPMyAdmin and that’s where the database server is running. This could be locally on a the same server as your hosting, or it could be on an external server with it’s own address.
To find this out, click on the PHPMyAdmin logo in the top left hand coner, then look at the “Database server” section toward the top right. Here’s what I see:

The top line of the “Database server” section reads:
Server: Localhost via UNIX socket
This means the address of the database server, for me, is:
localhost
If you see something other than localhost, you’ll need to make a note of this address (this might look like db.hostingco.net for example) as you’ll need it to update the wp-config.php file.
The things that you should now have noted down (you’ll need all of these, so review the above if you’ve missed any) are:
- The name of the database
- The name of the databse user
- The database user’s password
- The table prefix
- The address of the database server
Provided you have all of the above, you’re now ready to…
7. Update the wp-config.php file in the new hosting to connect WordPress to the database with the new provider.
You’ll need to open the cPanel file manager to be able to edit the wp-config.php file:
Then navigate to your domain’s document root, and locate the wp-config.php file within. Then right click on the wp-config.php file, and click on “edit”:

Once the wp-config.php file is open scroll down to the “MySQL settings” section:

These are the settings that your WordPress would have used to connect to a databse where it used to be hosted, so you’re going to need to update this with all the details you’ve made a not of so far:
In this section:
define(‘DB_NAME’, ‘hguby_wp939840274’);
You’ll need to update the hguby_wp939840274 part to the full name of the datase that you created in the new hosting, and made a note of, for example:
define(‘DB_NAME’, ‘clxx_mydbnamehere’);
You’ll need to update this part:
define(‘DB_USER’, ‘hguby_wp616’);
You’ll need to update hguby_wp616 to the name of the database user you created in the new hosting, for example:
define(‘DB_USER’, ‘clxx_newdbusername here’);
You’ll also need to update this
define(‘DB_PASSWORD’, ‘whkefg7t4g3)(eq02’);
To the password of the new databaase user, for example:
define(‘DB_PASSWORD’, ‘new_db_users_password_here’);
If the database server you took a note of from PHPMyAdmin isn’t localhost, you’ll need to update thsi part with the new database server’s address:
define(‘DB_HOST’, ‘localhost’);
For example:
define(‘DB_HOST’, ‘db.hostingco.net’);
If you scroll down the wp-config.php file a bit further you’ll find the table prefix section, which you might need to update with the table prefix:

So if the table prefix you made a note of is wp_ you’d need to change this:
$table_prefix = ‘wpsk_’;
To this:
$table_prefix = ‘wp_’;
Once you’ve updated the wp-config.php file, you’ll then need to save your changes:

And that’s it for the moving and reconnecting, what you’ve done so far is the moving of the WordPress site from one provider to another.
Now all you need to do is…
8. Repoint your domain’s DNS to the new provider.
There are two ways you can do this. One is by setting the nameservers of the new provider against your domain, and the other is by repointig your domain’s A record to that of the new provider.
The difference between the two methods:
Pointing just the A record: This only changes where your site loads from. All your existing DNS will stay as it is, including where your email routes to. The advantage of this is that it ONLY chnages where requests to your site are sent (the new provider), so only affects the site. The disadvantage is, that you could potentially end up payign two hosting providers, one for your emails and one for your website.
Changing the nameservers: This will bring the DNS with your new provider in to effect. Although this will repoint the site, it’s likely to also repoint where your emails route to. If you choose this option make sure you understand what you’re doing here, and if your intent is to move emails as well as your site, this is a good option, but you’ll need to have migrated your mailboxes and historical email before making this change.
There’s a guide covering how DNS works here, which will help you to decide which of the above is best for you.
If you don’t know what the nameservers are and would like to use this method, you’ll need to obtain these nameserver addresses from your hosting provider.
If you choose to repoint just your site’s address and need to know the IP address that you should point your domain to, you can find it on cPanel’s main page in the “Shared IP address” section:

The other thing to bear in mind is that if you chnage either the nameservers or the IP address it can take up to 24 hours for you to see this change. You can sometimes speed this up by rebooting your computer and you’re router, but this doesn’t always work (if your ISP is caching old DNS records, for example).
You can use the command line (Windows) or the terminal (MacOS and Linux) to ping your domain. If you see replies from the new hosting IP address, your computer is going to send requests to your site to where you’ve moved your site to.
Things can go wrong.
There are things that can go wrong with the migration process I’ve covered above. You’re moving data and updating a crucial file, and any mistakes made, missing data, or sometimes a difference between hosting platforms can cause the site to error on the new hosting. Some common problems and their fixes are as follows:
Error Establishing Database Connection:
If you browsed to your newly moved site and see this error, it means that WordPress can’t connect to the database:

This error is invaraibly caused by something being wrong in the wp-config.php file that you’ve updated. As this is a fairly common issue with WordPress I’ve written a post all about what causes the “error establishing database connection” and covers all the fixes as well.
One other thing to be aware of is that if you were noting all the details for the database in a program like word or copying and pasting directly from the cPanel interface things like the database name and database username can include some additional hidden formatting, which will cause wp-config.php not to function correctly.
To address this copy and paste all the “noted” information in to a plain text editor (notepad on Windows, textedit – with format set to plain text – on a Mac, and nano on Linux) this will strip any hidden formatting information. You can then copy and paste from the plain text editor in to the wp-config.php file, and no hidden formatting information wil/l then be copied.
Server 500 error.
This is usually caused by a mixture of a difference between hosting platforms and what’s in the site’s .htaccess file. This is because some hosting platforms add things to the .htaccess file (cPanel’s Multi PHP Manager does this). To fix this, locate the .htaccess file (it’s in the same directory as wp-config.php) edit it, delete ALL it’s contents, then add this in to the .htaccess file, then save changes:
# END W3TC Page Cache core
# BEGIN WordPress
# The directives (lines) between "BEGIN WordPress" and "END WordPress" are
# dynamically generated, and should only be modified via WordPress filters.
# Any changes to the directives between these markers will be overwritten.
<IfModule mod_rewrite.c>
RewriteEngine On
RewriteBase /
RewriteRule ^index\.php$ - [L]
RewriteCond %{REQUEST_FILENAME} !-f
RewriteCond %{REQUEST_FILENAME} !-d
RewriteRule . /index.php [L]
</IfModule>

# END WordPress
These are the minimum .htaccess rewrite rules that wordpress needs to function. By using just these you’re essentially stripping out any information that might be specific to your old hosting provider.
Unfortunately this will slao strip out anything that other plugins have added, such as caching or security directives, so you may need to resave/reconfigure plugins (specifically you’re security plugin) if you have to fall back on using the rules above alone.
There has been a critical error…
If you see an error like this when browsing to your site, your WordPress is erroring as a whole:

There are a lot of different causes to this error. The best course of action here is to enable debugging in your WordPress and then examine error log files to establish what the cause of the problem is.
I’ve covered most of the common issues and fixes to the “there has been a critical error” problem in this blog post.
In conclusion.
Moving a WordPress site involves copying the site data (both the site files and the database), then reconnecting the two using the site’s wp-config.php file, and the repointing your domain’s DNS.
The steps you’d need to take to move a WordPress site are:
- In the source wordpress installation, install updraft or all in one wp migration.
- Use updraft or all in one wp migration to generate a backup or export.
- Download the backup or export file.
- Repoint your domain’s DNS to the new provider.
- Install WordPress in the hosting account with the new provider.
- Within the WordPress with the new provider install updraft or all in one wp migration (depending on which you used to make the backup).
- Import and restore the backup/export using the respective plugin.
Things can go wrong when moving a site, or maybe not go to plan, but the common issues and fixes can be found in the section above.