Installing wordpress.
A few words of warning before you begin:
DO NOT PARTIALLY INSTALL WORDPRESS.
AFTER INSTALLING WORDPRESS SECURE IT IMMEDIATELY.
Why? Because you could well get hacked if you don’t, that’s why. You have to be a bit careful when installing WordPress as this is it’s most vulnerable state.
During the installation process you’ll have to specify a username and password to be able to log in to WordPress. If you get as far as the page where you define your WordPress username and password, then stop, this could be found and completed by someone else, and they’d then have access to your WordPress installation (I’ve seen it happen).
If you ever want to stop part way through installing WordPress. Make sure you use this guide to disable public access to your WordPress installation. You can find a guide covering how to do this here.
Before you can install wordpress.
If you’ve been following this walkthrough from start to finish, you’ll have already carried out the steps that you need to have completed before you can install WordPress. If you’ve just arrived at this page by other means, you’re going to need to carry out some steps and make purchases just to be able to install WordPress. These are:
- Register a domain
- Buy some hosting (preferably cPanel hosting if you want to follow this guide like for like)
- Install a certificate
- Create a database and a database user
You might also want to read the “WordPress – before you begin” article as well (if you haven’t done so already) as WordPress isn’t to everyone’s liking.
As long as you’ve carried out the above, you’re now ready to install WordPress.
Download wordpress.
First of all, you need to obtain a copy of WordPress.
You can download it from here:
https://en-gb.wordpress.org/download/
Just click the blue “Download WordPress X.X.X” button and it will download a compressed copy of WordPress to your computer.
Upload wordpress.
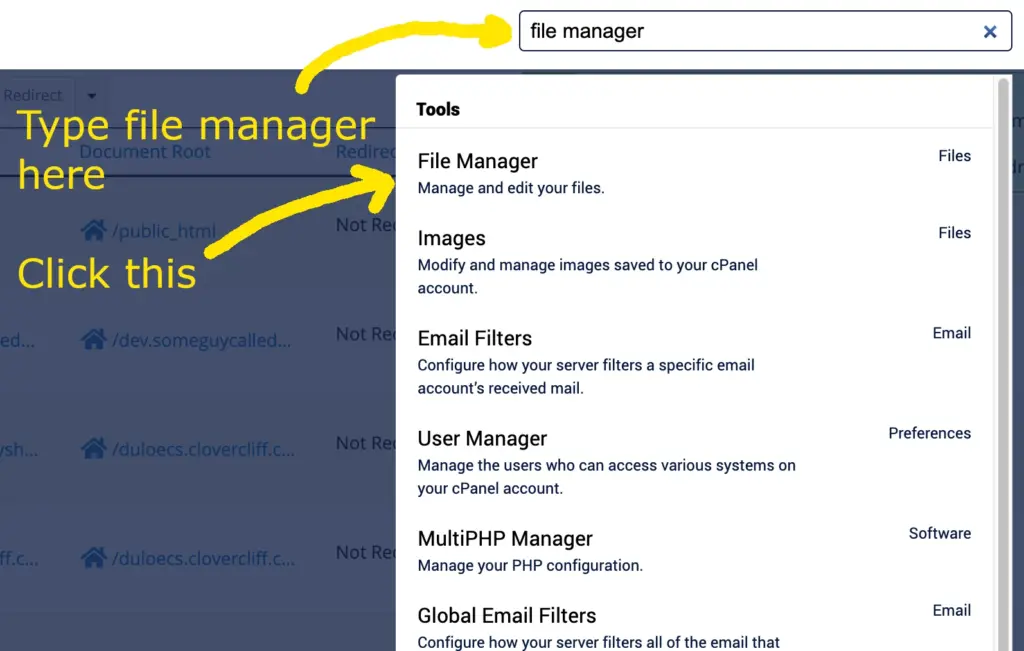
Now you need to upload WordPress. You can do this by opening the cPanel file manager, like this:
You’ll need to upload WordPress to your domain’s document root (the folder your domain is mapped to).
By default, if you’re using cPanel and have a “one domain only” type hosting account the document root of your domain will be the “public_html” directory. This is what this guide covers. If you’re using a multisite type hosting account and have multiple domains mapped to it, you can see the document root that domains are mapped to in the domain’s section of your cPanel.
You can find a more in depth explanation about document roots on this post.
Click on public_html inthe directory tree on the left hand side, then click on “upload”. Like this:

You’ll now see cPanel’s upload page. Click on “Select file”, like this:

Then browse to where you downloaded wordpress, select the WordPress file you downloaded, then click “open”. Like this:

You’ll then need to wait for the upload to complete (wait for the progress bar to go green), then click on “go back to…” like this:

You’ll now see the file you’ve uploaded in the cPanel file manager. It’s a compressed file, so now we need to extract it.
Extracting the WordPress files.
You’ll now need to extract the WordPress files. Still in the public_html directory, right click on the file you uploaded, then click on “extract”, like this:

Then confirm the extraction, like this:

And what you’ll end up with, is this:

As you can see, this has extracted the files in to a folder called “wordpress”. If we went straight to the wordpress install pages now, and ran the wordpress installer, this would make your site run on https://yoursite.com/wordpress.
We don’t really want to have the /wordpress part in the site address so now we need to move all the files held in here:
/public_html/wordpress
to here
/public_html
Moving the WordPress files to the correct directory.
Within the public_html directory, you’ll see a directory called “wordpress” (this was created when you extracted the files). You’ll need to move what’s in the wordpress directory in to the public_html directory. To do this go in to the wordpress folder by double clicking it:

You’ll now see a lot of files and folders. What you’re looking at is WORDPRESS! At last! Well, not quite, you’re just looking at the WordPress files and folders, and they’re in the wrong place. So now we’re going to select them all and move them.
Click “Select all” at the top of the page, and all the files and folders will go blue, then right click on any of the selected/blue files or folder, then select “move”. Like this:

Now we’re going to move them to the right place. As we’re using a one domain hosting account, this will be the public_html folder but if you’re using a multisite hosting account this may be different, so you’ll need to move the files to the folder that’s the document root of the domain on which you’re installing WordPress (check the domains section of cPanel if you need to check which domains have which folder as their document root).
For us though, we’re going to move them to public_html, so type public_html in the box, then click “move” like this:

And now we’ve got a little bit of tidying up to do.
We’re going to delete the wordpress folder (because it’s now empty) by right clicking on it, then clicking on “delete” like this:

And then we’re going to delete the wordpress zip file, as we no longer need it, so right click on the wordpress-x.x.x-en_GB.zip file, then click “delete”, like this:

Great, well done. WordPress is now in the right place, and we’ve removed the residue of downloading, uninstalling and extracting it.
Connecting WordPress to the database.
Remember when you created the database, the database user and assigned the user to the database? And how you made a note of the database name, the database user’s username and their password?
You did make a note of them right?
If you didn’t don’t worry, you can always see the database and the database user, and change the database user’s password in the MySQL databases section of your cPanel.
Now what we’re going to do is connect WordPress to the database.
To do this, locate the wp-config-sample.php in the public_html directory, right click on it, then select “rename”. Like this:

What we need to rename this file as is wp-config.php as this is the file that WordPress calls to be able to speak to the database. Enter wp-config.php in the “new file name” field, then click “rename file”. Like this:

Now we need to edit the wp-config.php file to update it with the database name, database username, and the database users password that were all specified when we created the database, created the database user and assigned the user to the database. Right click on the wp-config.php file, then select “edit”. Lke this

The section you’ll need to update looks like this:

You’re going to need to update:
DB_NAME with the name of the database you’ve created.
DB_USER with the username of the database user you’ve created.
DB_PASSWORD with the password you set for the database user.
You might also need to update DB_HOST with the name of a database server, but leave this as localhost for now, and seek input from your hosting provider if things don’t work as expected.
Remember to include the prefixes in the DB_NAME and DB_USER fields (the part before the underscore in the database and database user you created).
Remember to save your changes (by clicking the save button).
You should end up with a wp-config.php file that looks like this (I’ve had to blank some of mine out for security purposes):

You’ll know if you’ve done this correctly, because if you have, when you browse to your site, you should see the WordPress installer page (you’ll see a “Error establishing database connection” message if your wp-config.php hasn’t been set up correctly).
Running the WordPress installer.
To see the WordPress installer page, open a new browser tab, then, in the browser’s address bar type:
https://www.yoursiteaddress.com
You’ll need to replace yoursiteaddress.com with the domain you registered. Remember to use https:// and not http:// at the beginning of your site’s address. Why? Because WordPress “works out” the address that your site will run on based on the URL you use to access the installation pages.
You should see this:

Let’s break this down.
Site Title: This is what will be displayed on browser tabs when people visit your site. It can be changed later if there’s the need. Enter what you’d like to be displayed as the title of your site here.
Username: This is the username you’ll use to log in to your WordPress admin area (or back end). Don’t use the word admin as the username (hackers try and break in to sites using this username as it’s often used by default). Use something unique and hard to guess.
Password: This is the password you’ll use to log in to your WordPress admin area (or back end). Choose a strong password.
Your email: This is the email address where WordPress will send notifications.
Fill out the boxes, then click “Install WordPress”. You should see this:

Click the login button and you’ll see the page below. You can use then username and password you just specified to log in!

You’ve done well. Installing your first web application has been completed.
You might want to leave things here for now, but if you do, make sure you disable public access to your WordPress as it hasn’t yet been secured. You can find a guide covering how to restrict access here.
If you still have a bit of time on your hands, the next advisable step to take is to secure your WordPress, which you can find out how to do here.
